Posts
-
Let's Read the 4e Monster Manual 3: Wilden
Copyright 2010 Wizards of the Coast I believe wilden are new to 4e, first appearing in the Player’s Handbook 3 as an option for PCs. This is their corresponding Monster Manual entry.
The Lore
Wilden are the middle world’s immune response to the Far Realm. They appeared very recently, emerging from the Feywild’s deepest and most untouched natural environments. Theoretically, that’s a reaction to an upsurge in Far Realm activity in the world, and it’s worrying that the signs of that haven’t been noticed by anyone else yet.
Not even the wilden themselves have a clear idea of what caused them to emerge. The setting’s youngest sapient people by far, they have an instinctual drive to protect nature and oppose aberrant creatures, but they have yet to form a unified culture and traditions of their own. Most individuals turn to other creatures around them for examples. For many, those come from more established fey peoples like elves, eladrin, and gnomes. Others turn to the beasts of the wild, or to more zealous spirits like dryads and treants, and end up much fiercer and much less sociable. Some even fall in with evil fey like fomorians, ending up as villainous as them.
The Numbers
Wilden are Medium Fey Humanoids with a speed of 6 and low-light vision. As PCs, their gimmick is that they may assume one of three aspects after an extended rest, each of which changes their appearance a bit and gives them a different racial power.
Each of the three stat blocks in this entry belongs to a single aspect and carries that aspect’s related power, in a version stronger than what’s available to PCs. They’re Unaligned and may represent allies, neutrals, or hostiles as your story requires.
They’re all in the low-heroic range, which means you can find NPC wilden in the same areas where you’d find NPC elves and gnomes. They often use wolves, spiders and drakes as pets, and there are many such creatures that would be level-appropriate for a wilden encounter.
Wilden Destroyer
Wildens who adopt the aspect of the Destroyer are usually the designated warriors of their communities. They wield large carved wooden clubs, and every time they survive a battle they add a new carving to their weapons to celebrate it.
Destroyers are Level 2 Soldiers with 39 HP. Their carved greatclubs damage and mark for a turn on a hit, and they can throw handaxes as basic ranged attacks. If an enemy marked by the destroyer tries to ignore the mark, the destroyer gains a +4 bonus to attack and damage that enemy during their next turn. If a bloodied enemy attacks the destroyer or one of the destroyer’s adjacent allies, it can use the Wrath of the Destroyer encounter power to attack that enemy as a reaction. If this hits, the enemy becomes stunned for a turn.
PC Wildens in Destroyer aspect can use that power too, though for them it dazes instead of stunning.
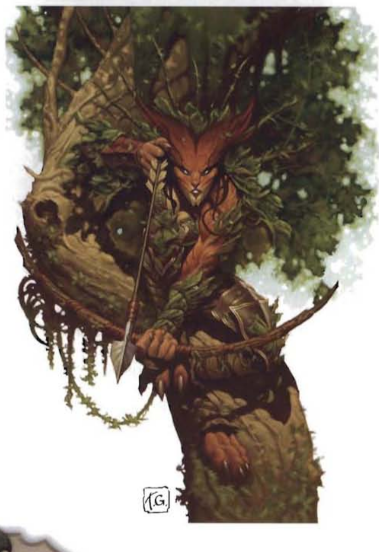
Wilden Hunter
Wilden who adopt the Hunter aspect fulfill that role in their community, and also make for excellent scouts. They are Level 2 Lurkers with 33 HP. They fight with shortswords and longbows that just make basic attacks. All their interesting stuff is in their passive traits and their racial power.
The passives are familiar to us by now: Camouflage allows them to make Stealth checks with only partial cover and concealment; Sniper lets them stay hidden when they miss with a ranged attack from hiding; and Hidden Shot lets them deal extra damage when they attack from hiding.
Their encounter power is Pursuit of the Hunter, which triggers when an enemy ends their movement within 2 squares of the hunter. The hunter can react by shifting 3 squares, and for their next turn they will deal 5 extra damage with their attacks against that enemy, and will also ignore partial cover and concealment against them.
PC Wilden in the Hunter aspect get a similar Pursuit power, except it deals 1d6 extra damage instead of the fixed 5.
Wilden Ancient
Wilden who adopt the aspect of the Ancients are their community’s shamans and guides. They’re called “Ancients” because their magic lets them cast their minds to the collective history of the Feywild and the world. When they go into these trances, their whole community stops to take care of them and await their awakening, which might bring important insights or prophecies with it.
The Ancient depicted here is Level 4 Artillery with 45 HP and the Leader tag. It’s a primal spellcaster who fights with a spear and with several combat spells. Their spear attacks are very weak but allow an ally adjacent to the target to make a free melee basic attack at +4 to hit.
Their combat spells have varied effects: Spectral Vine is a basic ranged attack that deals physical damage and pulls 2 squares; Rumbling Earth (recharge 5+) is a ranged area attack that damages and immobilizes (save ends); and Lightning Storm (encounter) is a ranged area attack that does heavy lightning damage, half on a miss.
Once per round as a minor action they can impart the Wisdom of the Ancients, granting them a +2 attack bonus for their next turn. And then they hit an enemy with an area attack, they can use their Voyage of the Ancients encounter power to teleport 3 squares and make one of the enemies they just hit grant combat advantage for a turn.
Despite their many controllery effects, it makes sense for Ancients to be artillery. They want to stay safe behind a wall of bodyguards and bombard their enemies, not mix it up in melee like a controller might want to do.
Final Impressions
I gotta say it feels a bit odd to find a low-heroic entry right after the high-epic Weavers, but that’s just a product of the book being in alphabetic order.
Wildens are serviceable enough as low-heroic enemies, about in line with what I expect from an entry dedicated to a creature that’s also a PC option.
-
Let's Read the 4e Monster Manual 3: Weaver
Copyright 2010 Wizards of the Coast Weavers have apparently been around since the days of AD&D, appearing in a Monstrous Compendium Annual there under the name “Spell Weavers”. Their 4e debut was actually in Dungeon #165, in the adventure titled “Secrets of the White Lotus Academy”. Here in the MM3 they get updated into a major cosmic threat.
As an aside, it was in a weaver ruin that Kyuss found the writings that let him become the Worm that Walks, back in the 3e adventure path.
The Lore
Weaver civilization is incredibly ancient, and what little remains of it seems to have been somehow shattered and spread across the cosmos. Records recovered from these few ruins seem to describe a terrible Far Realm incursion that tried to inject a seed of chaos into our cosmos. The Weavers tried to stop this, and were only partially successful. This is what shattered them.
To hear the Weavers themselves tell it, their civilization predated even the gods and primordials, and the event that caused its destruction was in fact what caused the universe to separate into the Elemental Chaos and the Astral Sea. Contemporary sages don’t believe this to be true, but the surviving Weavers certainly do. This belief is at the root of their disdain for all things divine. To them, the gods are just annoying upstarts. Their own bodies and minds are the product of aeons of transhuman enhancement. They’re much stronger, faster, and smarter than your average mortal, and possess an unparalleled multitasking ability that lets them even cast multiple complex spells at once.
Present-day Weavers preserve as much of their ancient lore as they can, and work on a grand plan to rebuild their civilization by undoing the planar disjunction that broke it. Yes, they want to smush the planes back together. If they’re right, it will be a very bad time for everyone else in the universe. If they’re wrong, it will be a bad time for absolutely everyone, including themselves.
Their plan has two parts. The first is to restore and repair as many weaver ruins as possible. Within each one is a planar portal that links all active ruins into a single network, and a mystical furnace that burns the life force of mortals and the enchantments that power magic items. By feeding these furnaces, weavers gather power for the series of rituals that will finally accomplish their goal.
A weaver will be most likely be found masterminding some plan to gather powerful mortal souls and magic items. They drain this power through enchanted chromatic disks that only work for weavers. Every individual carries one of these, though they specialize in different “flavors” of soul.
Weavers easily form alliances with other powerful groups that have the same negative opinion of the gods and a nihilistic bent, like tulgars and the Forsaken. They also hold great influence over the Nerra, leading some scholars to say the creation story in that entry is wrong and the Nerra are actually creations of the Weavers.
The Numbers
Weavers are Medium Immortal Humanoids. They have Darkvision, a ground speed of 6, and a teleport speed of 6. Their signature trait is Multitasking Brain, which limits the effect of the dazed condition on them: they only lose their move action, and can still take immediate actions (like interrupts and reactions).
The other signature trait is more of a design directive: most of a weaver’s attacks are minor actions, and they’re about as effective as a standard action from another monster would be. They’re also all Elites.
Each weaver statted below specializes in collecting the souls of characters who employ a different power source, using that same power source as its main weapon. There’s one for every power source except divine, whom they consider beneath them even as fuel for their furnaces. Ironically, this means divine characters have a bit of an advantage over weavers.
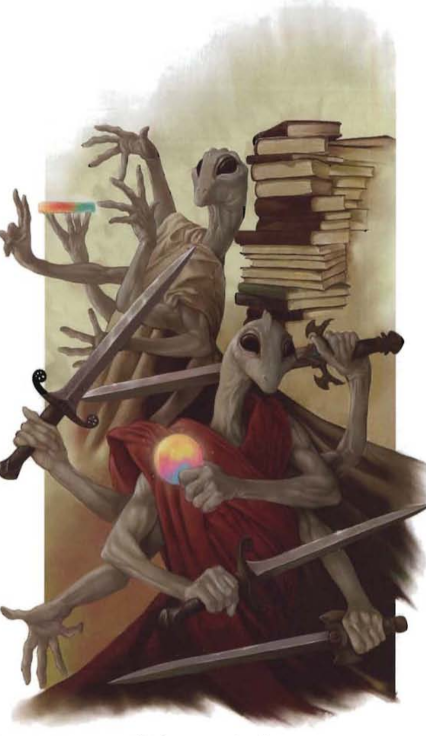
Spell Weaver
The classic model, concerned with the collection of arcane power. Spell weavers usually lead raids into secure locations in order to steal magic itens and particularly desirable souls. They’re planned months in advance with intel from spies and divinations, and usually involve the opening of a long-distance portal as close to the target as possible. Once the spell weaver has what it wants, it teleports back to the portal and escapes. It’s Level 28 Elite Artillery with 400 HP. Yes, according to this entry the typical weaver is equivalent to a demigod in power.
They have three basic attacks, all doable as minor actions: Esoteric Touch deals force damage and pushes 5 squares; Dimensional Ray allows the weaver to teleport 2 squares before rolling, deals untyped damage, and teleports the target 2 squares; and Esoteric Blast deals fire damage to its target and an automatic 10 fire damage to all enemies adjacent to it.
Also as a minor action, it can wield its chromatic disk and cast Extract Arcane Soul (recharge 5+). This can only target characters with arcane powers. It deals psychic damage and dazes (save ends). On a miss it deals half damage. Hit or miss, the weaver regains 20 HP. So this doesn’t extract your whole soul, just a bit of your life force. It’s still bad news!
They also have a standard action attack: Chilling Echo can be used to automatically deal 15 cold damage to all creatures the spell weaver has damaged since the start of its current turn.
Once per encounter, when the weaver takes damage, it can use Defensive Jaunt as a reaction, becoming invisible and teleporting 20 squares.
The spell weaver’s minor action attacks deal about half the damage you would expect from the MM3 formula, but the addition of Chilling Echo brings them back up to their expected potential. Don’t forget to use it!
Battleweaver
Possibly some of the best warriors in the universe, battleweavers wield 4 exquisitely-crafted swords in combat, and hold their chromatic disk in their other two hands. They collect the life force of worthy warriors. Battleweavers are Level 26 Elite Soldiers with 488 HP.
It’s imposssible to duel a battleweaver and come out unscathed, because their Blade Mastery acts as an aura (1) that deals 10 automatic damage to any enemies inside and marks them for a turn when this happens.
They have a standard longsword basic attack, but they’re usually going to open with one of their two minor-action maneuvers, which also count as basic attacks. Quick Jab deals light physical damage and slides the target 3 squares to a space adjacent to the weaver; sidestep jab does the same damage and allows the weaver to shift 3 squares to a space adjacent to the target. Combined, they allow the creature to lead its foes on a merry dance across the field. The basic attack can then act as a “finisher” in the round, bringing their damage potential to a level a bit above the one expected by the formula.
Battleweavers can use their chromatic disk to Extract a Martial Soul, targetting characters with martial powers. This is like the spellweaver’s version: it deals psychic damage, dazes (save ends), and heals the weaver for about 5% of its total HP (24 in this case).
If an enemy marked by the battleweaver within 10 squares makes an attack that doesn’t include the weaver as a target, the weaver can teleport to the enemy and make a melee basic attack against it, as an interrupt. This is the other main use of their standard-action basic attack.
Battleweavers will use their “jab” strikes to wander around the battlefield and disrupt PC formations while their aura damages and marks enemies. Like a swordmage, it will try to stay far away from enemies it has marked, to increase the chances of their mark triggering. It will use its stronger longsword attacks to punish mark-ignoring PCs or to pile on more damage on a target it wants to focus.
Thought Weaver
A weaver that specializes in the power of the mind. It usually doesn’t go out hunting like the others - instead it can be found in weaver ruins working to restore their gates and furnaces. If forced to fight, it will do so entirely through the use of psionic powers, barely moving unless absolutely necessary.
Thought weavers are Level 27 Controllers with the Leader keyword and 500 HP. Their basic attacks are minor actions:: Quick Strike is a standard melee attack, and Mind Spike is a ranged attack that deals psychic damage, inflicts a -2 penalty to all defenses for a turn, and slides the target 3 squares. They can also Extract A Psionic Soul, targetting a PC with psionic powers with the same standard Extract Soul effects. As standard actions, it can use two powerful mind control techniques:
Mental Puppet is a non-damaging attack that slides the target 5 squares, forces them to make a basic attack against a target of the weaver’s choice, and then dominates it (save ends). It recharges when no one is dominated by the power.
Command the Puppet automatically hits someone dominated by Mental Puppet. It deals psychic damage and has the same rider as the other power (slide 5 squares, make a basic attack).
If someone leaves a square adjacent to the dominated puppet, the weaver can use Guardian Puppet as an interrupt to have the dominated character use a basic attack against the triggering enemy.
Tought weavers can also choose to spend a standard, move, or minor action directing a Coordinated Strike, which essentially gifts the spent action to an ally within 5 squares and allows the ally to immediately take that action.
Hex Weaver
This is the weaver attuned to the Shadow power source. And what is the Shadow power source? As far as I know it’s basically “Arcane in a Halloween costume”. It started getting mentions as something distinct around this time, and would get a supplement all to itself named Heroes of Shadow the next year. To my knowledge it never got very popular due to this conceptual confusion with arcane magic and due to most of its associated classes not being very good. Anyway, it got a weaver here.
Hex Weavers are too cool to hang out with other weavers, and instead oversee portals into the Shadowfell from which they launch expeditions to pursue mysterious goals that may or may not be related to the overall plan of the weaver civilization.
A Hex Weaver is a Level 27 Elite Lurker with 382 HP, and it’s also too cool to follow the same rules as the other weavers. Its minor action attacks are Extract Shadow Soul, which has the usual effects but only targets creatures with shadow powers, and Shrouded Eye, a ranged attack that deals psychic damage and makes the weaver invisible to the target for a turn. The latter can only be used once per round, which breaks from the pattern.
This is also the weaver with the highest number of standard action powers: Shadow Grasp is a stronger, melee version of Shrouded Eye; Stinging Shroud is a close burst 1 that deals necrotic damage and is much stronger against creatures granting combat advantage to the weaver. And Shadow Mask is an encounter power that makes it invisible for a turn.
Finally, if the weaver is damaged, it can Step Into Shadow (recharge 4+) to become insubstantial for a turn and teleport its speed as a reaction.
Hex weavers are a bit disappointing. They’d be a lot more dangerous if Shadow Mask was a recharge or at-will power, or if Shadow Grasp was a minor action. They also had the problem that there weren’t a lot of shadow-based PCs around when they were published, because Heroes of Shadow was like six months away from its release.
Final Impressions
I’m not familiar with weavers from previous editions but I really like their lore here. The targetting restrictions on their Extract Soul attack do feel a little artificial, but are easily removed. I don’t like the shadow power source very much, so I didn’t like Hex Weavers, but the others are quite flavorful and powerful.
-
Let's Read the 4e Monster Manual 3: Verbeeg
Copyright 2010 Wizards of the Coast. This article is part of a series! Click here to see the other entries.
From what I’ve been able to find out, verbeegs have been in the game since the days of AD&D 1st Edition, first appearing in the Monster Manual II. This means the game had already run out of synonyms for “Giant” even back then, since their name is just a scrunched up form of “Very Big”. This is their 4e debut, with somewhat new lore.
The Lore
Verbeegs are a species of small-g giants who live in the same places of the middle world and the Feywild where you might find hill giants and ogres. The typical verbeeg is a lazy and greedy trickster who wants to make others work to keep them in a life of luxury. Their great size and strength helps with this, but they prefer to use their smarts and trickery to get what they want. Even when the con is harder than plain robbery, it’s also often more fun for them.
An example tale here is that of a verbeeg who set up at a river bridge and began charging a toll. The toll was expensive, but the giant promised to only collect it when the traveller came back to their side of the river. Travellers would lie and promise they’d pay, and when they were in the middle of crossing the bridge the verbeeg would lift the entire thing and tilt it towards himself, causing the victim to slide back. “You promised, now pay up!”
A strong verbeeg leader might be able to form a gang with several of his fellows, increasing the scale of their racket. Verbeegs also find it easy to take control of nearby groups of ogres and even hill giants, since their intellectual limitations make them easy to fool. A verbeeg band in charge of a larger ogre or giant band can be a threat to their whole region.
Verbeegs aren’t very big on fighting, despite being giants. They’ll avoid it for as long as possible, preferring to throw minions at the problem or to use trickery to escape and misdirect. If a battle is unavoidable, they favor mobile and stealthy tactics and combat styles.
Contrary to all expectations, verbeegs do have a code of honor they always follow. It consists of two rules: 1) never give a sucker an even break and 2) always keep your word. They can try to twist the wording of a promise quite far and add all sorts of clauses before committing to it, but once they do they must keep it.
I imagine you can make groups of non-hostile verbeegs with the same ease you could make groups of other friendly giants. In that case, the description above would apply to the ones you fight, not to the species as a whole.
The Numbers
Verbeegs are Large Fey Humanoids with the Giant keyword, even though their origin has nothing to do with primordials or capital-G Giants. They have a Speed of 8 and Low-Light Vision. Their signature trait is the hilarious Verbeeg Stealth, which allows them to hide and use the Stealth rules as long as even as single square they occupy counts as providing total cover or concealment.

It's surprisingly effective if you're not expecting it. Verbeeg Rowdy
The typical verbeeg ne’er-do-well, of the kind you can find operating alone or in command of a gang of ogre patsies. In larger bands they make up the rank-and-file. It’s a Level 9 Skirmisher with 99 HP. It wears hide, carries a shield, and wields a Reach 2 spear in battle.
The spear can be used for basic attacks and for a Skewering Strike that deals more damage and slides the target 5 squares to a position within 2 squares of the verbeeg. Perfect for getting those pesky defenders out of the way. All of these deal bonus damage if the rowdy has combat advantage against the target.
They can also use a Bounding Maneuver as an at-will move action, which cancels any marks on them and allows them to shift 3 squares and to pass through enemy spaces while doing so.
Their Cunning Trick minor action (recharge 5+) is a reach 3 attack vs. Will that does no damage and knocks the target prone on a hit.
If a rowdy has to fight, it’s not gonna stay still, and it’s going to focus on knocking people down and skewering them with its spear before bounding away to safety.
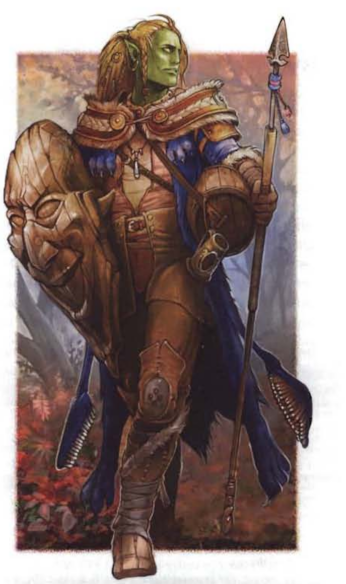
Verbeeg Ringleader
The sort of individual you might fight running a gang of other verbeegs and dumber lackeys, and the one responsible for coming up with their verbeeg plans. It’s Level 11 Artillery with the Leader tag and 91 HP.
Ringleaders are warlord-types and project an aura of Cunning Insight (5) that gives bonus damage to an ally that has combat advantage against their target. They carry Spears but prefer to stay away and use their Longbows, whose basic attacks make the target grant combat advantage for a turn. Distracting Shot (recharge 5+) and also gives an ally in reach a free melee attack against the target.
Finally, the very flavorful Get Them! encounter power allows three allies within 5 squares of the ringleader to make a charge attack for free.
Verbeeg Trickster
This one managed to score a spellbook or two and learn some combat magic. It’s a Level 11 Controller with 115 HP. Their spear strikes knock the target prone on a hit, and they have four spells:
Staggering Bolt is a ranged attack that deals force damage and slides the target 1 square; Blinding Blast (close blast 5 vs. Fort, recharge 5+) deals light radiant damage and blinds for a turn; Bewildering Bolt (encounter) deals psychic damage and prevents the target from attacking (save ends); and Concealing Mist (encounter) creates a zone of mist in a close burst 2. The zone is lightly obscured, and gives any verbeeg that starts their turn inside combat advantage against every enemy outside the zone.
Tricksters want to set their mist zone up and stay inside while they shoot at the PCs outside it with their spells. Staggering bolt helps keep them outside, and Bewildering Bolt is excellent to shut down controllers or ranged strikers for a while. IF there’s a ringleader in the same encounter they’ll also want to stay inside the mist.
Final Impressions
Surprisingly personable and very big fey rascals. I wouldn’t want to make the entire species fit the stereotype, but verbeeg bandits are a nice surprise to spring on players who expect the giants plaguing the land to be dumb brutes incapable of subtlety. Add 4 levels or so to the stat blocks present here and you can upgrade their underlings from ogres to hill giants.
You can have lots of fun as a GM if you have your party fight a verbeeg bandit gang on a series of hilltops crowned by standing stones. It’s both a very fey-themed arena, and gives them plenty of hiding places. “These guys are ten feet tall, how could they sneak up on us like that?!”
-
Let's Read the 4e Monster Manual 3: Umber Hulk
Copyright 2010 Wizards of the Coast This article is part of a series! Click here to see the other entries.
MM3 Umber Hulks are in a similar situation to a lot of other monsters in the book. The Monster Vault would soon be released with an updated selection of basic models, and so this one features a trio of more niche variants.
The Lore
As usual, the basic lore remains the same, but this entry adds some interesting new details.
The first new bit is that umber hulks are one of the oldest species in the world! The creatures are already mentioned in certain ancient records from before the Dawn War, which makes some sages think they emerged from the raw stuff of the world before the primordials had finished creating it.
The second is that their role as the world builders of the Underdark has a dark side. Their tunnels may end up linking places that were best left isolated, like two mutually hostile settlements. This is one of the reasons why underdark civilizations tend to hunt them down. Some dwarves are also fond of chasing umber hulks as they tunnel through the earth, for they commonly pass near veins of precious metals.
Finally, these creatures are not a middle world exclusive! In ages past, small populations of them found and walked through subterranean planar portals and spread to places such as the Astral Sea or even the Abyss, and proceeded to adapt to these new environments.
The Numbers
Umber Hulks are Magical Beasts and have a ground speed of 5 and a burrow speed of 2 with Tunneling, which means their digging creates stable tunnels. They have Darkvision and Tremorsense 5 as usual.
Umber Ravager
This is a smaller and weaker relative of the basic umber hulk, so named because it’s Medium and so it’s not technically a “hulk”. They wander closer to the surface and are likely to be the first variant found by PCs who are not yet powerful enough to brave the true Underdark.
The ravager is a Level 7 Brute with 95 HP. It can attack with a claw that does light physical damage, and can be used in a claw flurry that allows it to make two attack with a single action. Its most basic psionic power is a Crushing Gaze (close blast 3 vs. Will) that deals light psychic damage and knocks targets prone. Less often it can use a Disarming Gaze (ranged 3 vs. Will, recharge 6+) as a minor action that deals no damage but causes stun (save ends).
Umber Ravagers hunt in packs, so you might see encounter groups featuring several of them. Each one will target a different PC with its Disarming Gaze as an opening move, and then focus its attacks on the stunned target. Yikes!
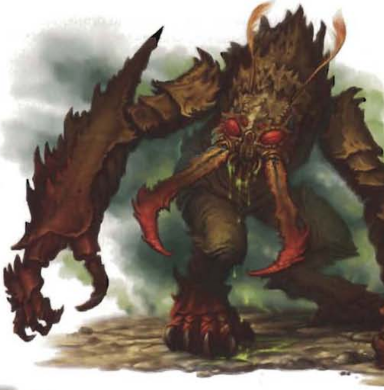
Abyssal Hulk
This hulk’s ancestors managed to dig their way to the Abyss, and then suffered mutations that allowed to survive there. Its bodily secretions became acidic, and its psionic powers changed to be more madness-themed. It’s also smarter and more consciously malevolent, with a Chaotic Evil alignment.
Abyssal Hulks are Level 15 Controllers with 152 HP. They fight up close with Reach 2 claws, and with a Gaze of Chaos (close blast 3 vs. Will) that deals light psychic damage and slides the targets 3 squares on a hit. After sliding, the targets make a melee basic attack against a target of the monster’s choice. It can also spray forth some Acidic Spew (close blast 5 vs. Fort) to inflict 10 ongoing acid damage (save ends) on those it hits.
As a minor action, the abyssal hulk can use a Gaze of Crushed Will (close blast 5 vs. Will) to slide targets 3 squares and inflict a -5 penalty on any saves they roll during this movement. You know when you roll a save during forced movement? When someone uses it to push you off a cliff.
So yeah, this cruel mutated almost-demon wants to alternate pushing people off cliffs with making them stab each other while singing “stop hitting yourselves!”.
Astral Hulk
Despite going to the realm of shiny light, Astral Hulks aren’t any less unpleasant than their abyssal counterparts. There are signs that they may have been engineered on purpose by some primordial for use as a weapon, because they just love to dig into astral domains and tear them up until they become free-floating debris fields. Several such domains were destroyed by astral hulks, and the people of the Astral Sea are always on watch against astral hulk infestations. Their gaze causes a pronounced lethargy on victims, and lures them closer so the creature can use its natural weapons on them.
Astral Hulks are Level 17 Soldiers with 167 HP. Their Claws damage and mark for a turn on a hit. If a marked enemy shifts, the hulk can use Entrapping Mandibles on them as an interrupt, grabbing them on a hit. Their Gaze of Lassitude (close blast 5 vs. Fortitude) deals untyped damage, pulls 4 squares, and slows (save ends). Their Gaze of Annihilation (close blast 5 vs. Fortitude) is an encounter power that does untyped damage, half on a hit, and marks everyone it hits for a turn.
Final Impressions
If you like umber hulks, you’ll find a use for these. I like that they’re all very focused in their design intent. There’s one to introduce your players to the monster earlier, and two to make them despair after they thought they had left these things behind when they moved out of the middle world.
-
Let's Read the 4e Monster Manual 3: Tulgar

Copyright 2010 Wizards of the Coast. This post is part of a series! Click here to see the other.
This is the first time I’m seeing this monster. If they appeared in previous editions, it was with a different lore.
The Lore
Once upon a time, during the days of the Dawn War, there was a certain place in the world that was a major nexus of primal power, connected to a great number of spirits. This place was annihilated by one of the many cataclysms being thrown around as weapons during that war. It was not the target - it was collateral damage. And it was a god who pulled the trigger.
The spirits of that sacred site were cast into the world, rootless and homeless. Spirits of place without a place, their rage against the gods knew no bounds. In order to survive, they cast part of their spiritual nature aside and took on material forms made of flesh, becoming the first tulgars. And then they swore to destroy the gods and their servants in revenge for what was done that day.
The tulgars would soon find out that attaining their revenge was much harder than they thought. After the Dawn War ended, the gods retreated to their domains and no longer stepped into the world. Their followers very quickly grew in number and built complex societies that were much harder to destroy than the scattered fleeting villages of the War. Many of the tulgars gave up on their oath over the ages, and now live as bitter mercenaries. Some of them, though, still keep that flame of hate going and try to find ways to accomplish their original goal.
Metaphysically, a tulgar is more or less the primal equivalent of a daeva or rakshasa. When they die, they are immediately reincarnated elsewhere in the world in a new adult body, with intact memories of their previous lives. I don’t think they can reproduce by natural means, but they have been increasing their numbers. They can sense when a primal spirit loses its home or becomes hateful of sapient mortals or their gods, and converge to the spirit’s location to convince it to join their numbers.
The Numbers
Tulgars are Medium Natural Humanoids with a ground Speed of 7 and the Forest Walk trait. Their signature ability is Unbroken Spirit, which triggers when they hit 0 HP and gives their nearest ally a “parting gift” of 10 temporary HP and a +2 to attacks, defenses, and damage that lasts for a turn.
All the stat blocks here present us with early-epic threats, which is appropriate for a people who swore vengeance on the gods and has a real shot at achieving this. It’s possible they would make good allies for the Forsaken, since they have similar goals.
Tulgar Flesh Hunter
A hunter of sapient prey, with centuries of accumulated experience. This is a Level 22 Skirmisher with 209 HP. It fights with a Spear and a Handaxe it uses as a thrown weapon. Its On the Hunt trait makes it not provoke opportunity attacks when it moves for a turn after hitting an enemy.
The flesh hunter can use Hunter’s Onslaught to make both a spear and a handaxe attack against different targets on its turn. The ranged attack doesn’t provoke opportunity attacks when used as part of this power, and the power can be used in place of a basic attack during a charge! In other words, no reason to use a single basic attack when this is available.
Additionally, flesh hunters can use a Rotting Strike (recharge 5+) to deal light damage and inflict ongoing necrotic damage on the target (save ends).
Tulgar Savage
This unfortunately named enemy is a Level 22 Minion Brute. They have a spear and a handaxe like the flesh hunter, though it does minion-scale damage. Their Critical Threat ability allows them to crit on a 19-20, and when they do they grant a free melee basic attack to an ally within 2 squares.
Oh, and they have Unbroken Spirit too, so they make a powerful contribution to their allies by dying.
Tulgar Half-Spirit
A tulgar that keeps more of its spirit side than most others. It’s a Level 23 Lurker with 116 HP, and it’s Insubstantial.
Its basic attack is a Claw that deals minor necrotic damage and immobilizes for a turn. It also turns the tulgar invisible for a turn as an effect. If it hits someone who can’t see it, the half-spirit also dazes the target for a turn, so there’s your lurker loop right there. It can also throw handaxes if no one is at hand.
When the half-spirit becomes bloodied for the first time, it Unleashes the Inner Spirit (close burst 3 vs. Fortitude), dealing necrotic damage and stunning those it hits for a turn. The half-spirit then becomes invisible for a turn and teleports 5 squares.
Tulgar Warrior
This elite combatant doesn’t care about ranged attacks, and is all about charging to melee and laying waste to armies. It’s a Level 23 Brute with 265 HP. Its Inveterate Warrior trait makes it crit on a 19-20, and deal 3d12 extra damage on a crit. That last bit might just be a codification of its greataxe’s High Crit trait, since it’s not spelled out in this stat block.
The warrior’s basic axe attacks also inflict a -2 AC penalty for a turn. Its Whirling Frenzy maneuver is an encounter power that allows it to attack everyone in a Close Burst 1, shift 3 squares and repeat the burst attack once more against anyone who wasn’t hit by the first one.
Tulgar Spirit Talker
Some tulgars retain a stronger connection to their former spirit nature and can use that to cast spells. However, the other side of that connection is still broken, and this slowly erodes their mental stability. Over time, a spirit talker might become unable to live in its community, and the others consider it a mercy to kill them so that their minds might be mended by the process of reincarnation.
Spirit Talkers are Level 24 Controllers with 225 HP. They project a Primal Barrier aura (2) that makes all spaces inside difficult terrain for creatures without phasing or forest walk. It fights with a Spear whose attacks make the target be marked by one of the tulgar’s allies within 10 squares. Its ranged basic attack is the Incite Savagery spell, which deals psychic damage and has an interesting rider. If the target doesn’t make a melee attack on its next turn, it grants combat advantage until the end of its following turn. A great power to use on primarily ranged attackers!
As a minor action the spirit talker can cast Dismissal (recharge 4+), which targets a conjuration, summoned creature, or zone within 10 squares. It attacks the Will of its creator, and on a hit it causes the target effect to end! If there’s nothing to dispel, the spirit talker can use Call Spirit Warrior to summon a tulgar minion to its side, acting right after it in initiative order.
Instead of Unbroken Spirit, the Spirit Talker has Death’s Embrace, which works the same but makes its aura stick around as a zone with the same effects until the end of the encounter.
Final Impressions
I like the lore of the tulgars here, because you can see how they might have a reason for being bitter and angry. I’ll note that the stat blocks here are all Unaligned, which means the book might agree with me. The only thing I dislike here is the use of the word “savage” in both the minion’s name and the spirit talker’s ranged attack.
You can play some tulgar groups as being vengeful against the gods and perhaps leaning more towards Evil, but you can also portray them as people who gave up on that vengeance but still can never go back to what they were, which is a very different story. Maybe some of them might be looking for a way to become full spirits again, and it might be something that brings them into alliance with the PCs or with sympathetic NPCs.
subscribe via RSS