Posts
-
Quar and Their Guns in GURPS
Recently, I became aware of the Quar. Aren’t they neat?
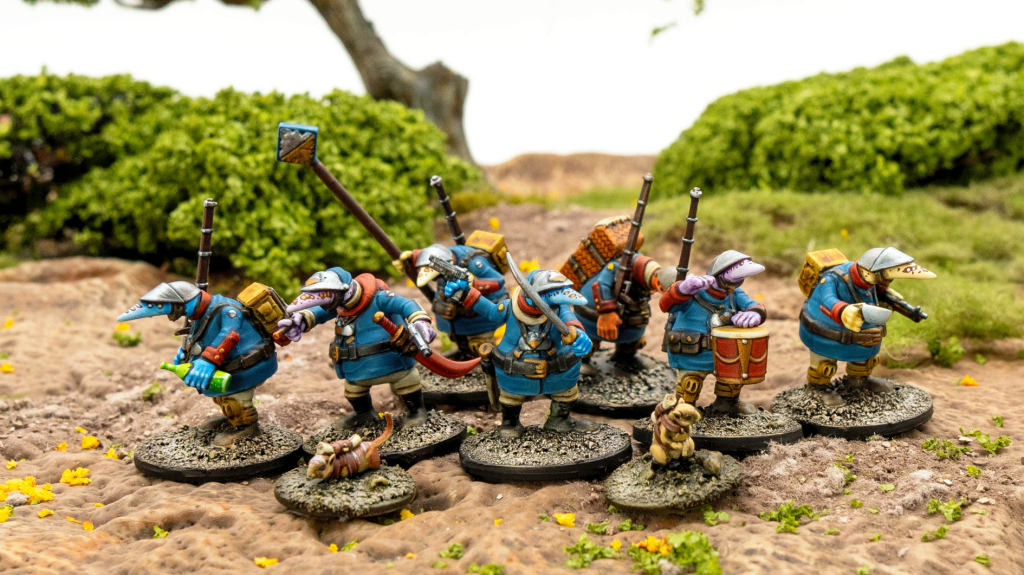
A squad of Quar soldiers, with officers, standard-bearer, and messenger squirrel handler. Source: https://rhyfler.com These funny anteater people are the stars of a couple of miniature wargames, the 28mm-scale Clash of Rhyfles and the 15mm-scale This Quar’s War. Both of these have their rulebooks freely available here, which is also where the image above comes from.
An individual Quar is a funny little person who just wants to chill with a hot cup of tea and a plate of moth cakes. Quar societies however are very, er, quarrelsome, so most of their history is an endless procession of wars.
I was motivated to write this article both because I think the setting is neat, and because the technical information about Quar weapons in the Clash of Rhyfles game made me think I can stat them up in GURPS.
Very Short Setting Summary
The wargames cover a particularly turbulent period in the history of Aldwyn, the Quar home world. It’s marked by at least twenty years of worldwide trench warfare between two large multinational coalitions. The tech level is somewhere between WW1 and WW2, and this is pretty much the war that introduced industrial warfare to their world.
If the idea of these adorable creatures being fed into one of the worst meat-grinders imaginable is horrifying to you, then you get the setting’s main idea. I’ve heard it described as “grimsical”. It replaces the “dark” vibe from “grimdark” with “whimsical”, but it’s still grim. The cuter the miniatures for their soldiers and tanks get, the stronger the dissonance becomes.
The Clash or Rhyfles quickstart book centers on the two main factions of the war. The Crusade is a coalition of former monarchies who successfully toppled their old regimes and became republics. They’re led by the Republic of Tok, and made up of many smaller nations that follow the same standards for equipment and tactics. The rules here could be used for quar from any of those places.
On the other side, the Kingdom of Coftyr leads an alliance of the world’s remaining monarchies to stamp out this revolution. Each kingdom here tends to be visually distinct, as their whole thing is adherence to ancient traditions and heraldry. Therefore, the book only covers Coftyr itself.
Free add-ons provide details for “sub-factions” allied to either side. These are Crusader or monarchist nations who do their own thing on the battlefield.
As usual for wargames, both sides are morally ambiguous. Opposing monarchy is a good thing in my book, but the Crusade is also the side that introduced industrial warfare to the world. Coftyr flavor text is all about honor and chivalry and heroism, but they adopted industrial warfare just as readily and at the end of the day are still defenders of absolute monarchy.
I get the impression that the world of Alwyn could settle into a more or less stable configuration if everyone just stopped and signed a status quo peace treaty, but they’ve all been fighting for 20 years by now and none of their leaders show any sign of wanting to stop.
As usual for wargames, you pick the side you think looks neater, paint them up, and pit them against other factions in battles that would fit somewhere in those decades of war. Most of these battles focus on infantry with the occasional tanks thrown in. There seem to be airships, but I don’t know if they have airplanes yet.
Quar in GURPS
The typical Quar is about 1.5 meters tall and weights around 60kg. They follow a largely humanoid body plan. Their skins can take on any of a large number of hues, from yellows and greens to blues and purples and oranges. Often, they’re a little mottled. Their diet tends to include lots of bugs, though those are often prepared as ingredients in dishes that we would otherwise recognize.
Stat-wise, I’d say they are absolutely identical to humans. If you insist on being strict, make them about a foot shorter than their ST would indicate, but do not adjust their stats in any other way. Being a Quar costs 0 points.
Because that’s the thing, you see? Quar are just people. The horrors inflicted on them are horrible because war is horrible, not because Quar are adorable.
Quar Guns in GURPS
Guns in Clash or Rhyfles don’t actually have damage ratings, just range and optional traits. The results of a ranged attack roll depend entirely on the degree of success for your skill roll. They might leave a target unaffected, Gobsmacked (stunned) or Taken Out, which is different from “dead”: they might still be rescued during or after the battle.
However, the skirmish game rules include enough fluff about the infantry weapons of the Crusade that I kinda want to try statting them up in GURPS. If I ever get the same information for the Coftyri ones, I’ll stat them up too.
The book mentiones the muzzle velocity and caliber of a couple of the weapons, and if I make a guess about the weight of the bullet I can plug those three things in the simplest possible version of the unofficial official GURPS ballistics equation to get a damage figure.
That link also contains a complete spreadsheet that demands things like chamber pressure, which I have no chance of figuring out. So stuff like Accuracy and range will be derived by the older method of eyeballing existing guns, as will bullet weight.
The numbers in the original material are just there for color, of course. None of them affect the rules of the miniature wargame itself. But if we take them as true, we see that Quar are very fond guns with big bullets and powerful propellant charges, fired out of guns with short barrels and very light construction. The recoil on those is gonna be ridiculous.
The Bogen Rifle
The signature weapon of the Crusade rhyfler, the Bogen semi-automatic rifle is said to fire a 12mm bullet at 580m/s. It uses a 5 or 10 round magazine and weights 2.4kg “fully loaded”. Its effective range is 150-250 meters.
The closest real-world bullet to this one in GURPS High-Tech is the .45-something family of rifle rounds, which are 11.43mm in diameter and weight 31 grams. After some fiddling, I decide to go with a slightly lower 27 grams for the Quar bullet, which gives us exactly 7d damage. This is pi+ because of the caliber. Picture them as being broader, shorter and rounder than Earth rifle cartridges, which is in theme for all things Quar.
This gives us a gun that packs about the same punch as a real-world M1 Garand rifle while having almost exactly half its weight and about the length of an M16 assault rifle. That’s going to have a significant kick, to say the least.
TL Weapon Damage Acc Range Weight RoF Shots ST Bulk Rcl 7 Bogen 7d pi+ 3 900/3500 2.4kg/0.36kg 3 5(3) 11† -5 4 The Rhyshi (R4) Heavy Rifle
Only slightly longer than the Bogen, the Rhyshi fires a huge 20mm round with a 720m/s muzzle velocity. Its magazine carries seven of those, and it’s said to require a solid stance and firm support to shoot with any kind of accuracy. A squad mate’s shoulder will do for support, according to the book, but I’m going to give this rifle an integral folding bipod because I’m not a monster. A properly braced R4 has greater range than the Bogen, and can penetrate up to “medium” vehicular armor.
The closest thing to this I can find on High-Tech is the Mauser Tank-Gewehr 18, the WW1 German anti-tank rifle. Its caliber is “only” 13mm, but it’s the largest anti-tank rifle in that table that is even removely Quar-portable. Plugging its bullet mass, caliber and printed velocity in our magic spreadsheet, we get 10d+3 damage, which following High-Tech convention can be rounded and written as 5dx2. Let’s also give it an armor-piercing round, because I see the WW1 tank examples in the book have DR 45.
5dx2 is the same damage as the T-Gew18, but the Rhyshi again weights less than half of what the real gun does. It’s not that much longer than the Bogen either, so it’s gonna be a beast to handle unless it’s properly braced. As the book says, Quar Crusaders frequently attach a bayonet to the Rhyshi because there’s no way it can be fired in close quarters.
TL Weapon Damage Acc Range Weight RoF Shots ST Bulk Rcl 7 Rhyshi 5dx2(2) pi+ 4 1100/4400 7.5kg/1kg 3 7(3) 18B† -6 7 Grifkis Shotgun
This is a 10-gauge, six-kilo trench gun firing buckshot ammo. The only Crusade gun to still be largely hand-made, it’s carried by officers as a badge of honor and a symbol of courage. The illustration shows its barrel is fairly short, but it still has a shoulder stock.
No need to fiddle with spreadsheets this time, we have a 10G double-barrel shotgun in High Tech. Let’s borrow its stats and adjust for the shortened “whippet” barrels:
TL Weapon Damage Acc Range Weight RoF Shots ST Bulk Rcl 6 Grifkis 2d-1 pi 3 40/800 6kg/0.15kg 2x13 2(3i) 12† -4 1/7 The short barrels give this gun a more pronounced muzzle blast (+1 to Hearing and Vision to locate when fired in the dark). I’m using the listed weight for it here, which makes it about 50% heavier than the real world example from High-Tech. Big caliber, two barrels, extra chonky? This is basically the Doom Super Shotgun.
H-11a Light Machine Gun
According to the book, this LMG fires the same round as the Bogen rifle, and the Crusade likes to use it as an offensive squad support weapon. It appears longer than the rifle, and can also be used in vehicular mounts when the force can’t find heavier MGs to put in there.
I think I’m just going to crib from High-Tech again, and blend some of the Bogen’s stats with those of the MG34.
TL Weapon Damage Acc Range Weight RoF Shots ST Bulk Rcl 7 H-11a 7d pi+ 5 900/3500 15kg/2.5kg 15 50(5) 12B† -7 2 This gives us a gun that’s actually heavier than the Rhyshi rifle, and whose recoil is manageable enough that it’s worth firing more than one bullet per turn. It fires rounds from a non-disintegrating cloth belt.
Final Impressions
Look at those things. Just look at them. Their damage values combined with the light weight and short barrel means they have powerful powder charges. Quar like big booms and they cannot lie.
The recoil on these things means the act of firing them is somewhere between “comical” and “painful for the shooter”. I’m guessing that a Taken Out result in the wargame very often means the target got spooked and decided to play dead, instead of actually being hit. This also explains why a quar can take themselves out on a bad skill roll.
-
Let's Read the 4e Dark Sun Creature Catalog: Giant
This post is part of a series! Click here to see the rest.
Athas has a lot of the same giants we can see in the Monster Manuals and Monster Vault. Athasian giants are less militarily aggressive than their counterparts in other worlds, but they still don’t like interacting with the “small folk”. They prefer to make their homes in isolated islands on the Silt Sea. A giant who wants to visit the mainland can often just wade through what to them is chest-high silt. PCs might be able to negotiate a ride with such a giant, if they’re diplomatic enough.
In this entry we’ll take a look at two Athas-specific giants, whose descriptions will help explain why they don’t like the small ones very much.
Beast Giants
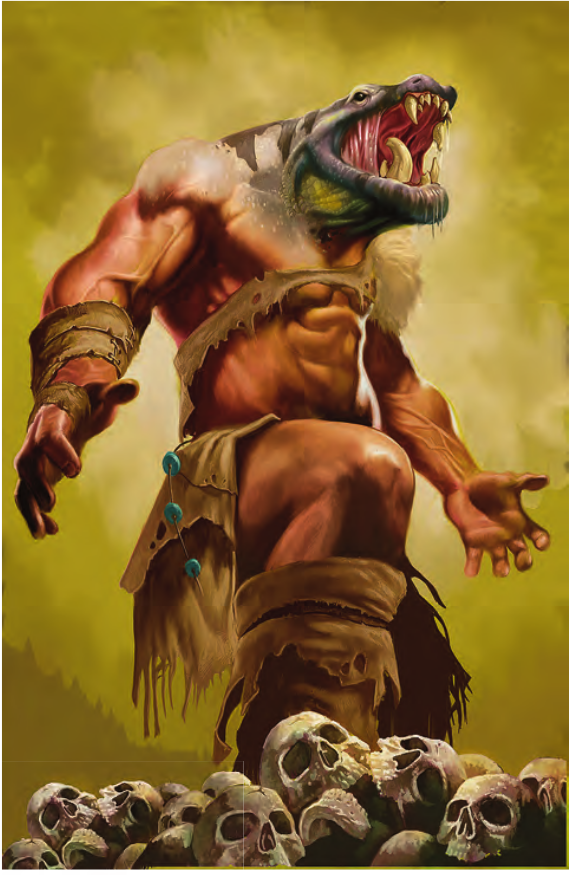
A snake-headed beast giant. Copyright 2010 Wizards of the Coast. Beast Giants are the product of psionic experimentation by ancient masters of the Way, who have stabilized into their own species. They have bodies similar to that of hill giants, but the heads of beasts.
Each giant’s head is different, and can be similar to that of any Athasian beast, whether currently living or extinct. So PCs might be faced with something familiar like a Cilops or Baazrag-headed giant, or with some exotic ancient cryptid like a lion, tiger or bear. Oh my! Their skill at mind-reading is such that they can copy most techniques used against them on the fly during a fight.
Beast Giants are fairly cosmopolitan sorts and frequently associate with other types of giant and giant-kin who share their islands: hill giants, firbolgs, brohgs, and others.
Beast Giant
The typical beast giant is Large Natural Humanoid (Giant) and a Level 15 Brute with 180 HP and a ground speed of 7 and Low-light Vision.
No matter what their head looks like, it gives them a Rending Bite that deals heavy immediate damage and ongoing 5 damage (save ends). Once per encounter they can use the Red of Tooth power to make three bite attacks on the same action, each against a different target.
When someone attacks a beast giant, they can use Psionic Retention as a reaction. They still suffer the damage and any riders normally, but they also “retain” that result, so keep a note of it. They can then use this to power their Psionic Release attack (melee 2 vs. Fortitude). A hit deals the exact same amount and type of damage, and the exact same riders, as the giant’s “retained” attack. Psionic Release recharges when the giant uses Psionic Retention again, so it effectively “spends” the retained attack.
Beast Titan
The oldest Beast Giants have grown enough in power and size to qualify as Beast Titans. They’re a lot more aggressive than their younger counterparts and love displaying the skulls of their enemies as trophies.
These are Huge instead of Large, and they’re Level 20 Elite Brutes with 466 HP. Their ground speed is an 8, and their Beast Reflexes let them roll a save to avoid falling prone.
Their Psionic Retention and Release powers work the same as the giant’s, with the greater range and numbers from their larger size and level. Their Gnashing Bite is also upgraded.
As a minor action the titan can use Titan’s Embrace (melee 3 vs. reflex) to do some light damage and grab on a hit. And once it has a grabbed victim, it can use Head Rip to deal massive damage, plus the same ongoing damage as the bite. The giant also throws the victim 10 squares and knocks it prone at the end.
Shadow Giant

A human adventurer cowering from a shadow giant. Copyright 2010 Wizards of the Coast. Unlike the Death Giants of the monster manual, who are merely death-_themed_, Shadow Giants are actual undead. They’re vengeful spirits who seek retribution from an ancient slaughter, likely from the Red Age. They look like shadows cast on a wall.
They tend to be loners, or to ally with those giants that still retain a strong elemental connection (like fire and stone giants). Sometimes, a brohg renegade will seek them out to learn the ancient arcane secrets the shadow still rememebers.
Shadow Giants are Large Shadow Humanoids with the Undead and Giant tags, and Level 18 Soldiers with 185 HP. They have darkvision, a ground speed of 7, and a flight speed of 3. Like most undead, they are immune to disease and poison and have 20 necrotic resistance. They’re also insubstantial, but lack Phasing.
A shadow giant projects an aura (5) of Shadow Malaise that halves any healing that takes place inside. Whenever they take radiant damage, they’re Revealed by Radiance and become substantial for a turn.
Their basic attack is a Necrotic Touch, which targets Reflex, deals necrotic damage, and marks on a hit (save ends). They also have a non-basic Death Touch that is similar, but exchanges some of its direct damage for an additional ongoing 10 necrotic damage rider (save ends both this and the mark).
If a marked enemy makes an attack that doesn’t include the giant, they are Cast Into Shadow as a reaction. This is a melee attack that targets Reflex. A hit does no damage, but removes the target from play for a turn! This means they’re stunned and removed from the map, reappearing at their previous position when the effect ends.
The giant’s ability to possibly mark multiple PCs makes it a very effective “defender”. Cast Into Shadow is a very potent “save or suck” attack, so PCs will have an extra incentive to focus on the giant and not on its other buddies. And if they don’t, the giant has just removed a whole PC from consideration for the next round.
Encounters and Final Impressions
Athas is prime giant country and plenty of core giants would be happy as clams living here, but I guess it makes sense to have some setting-specific ones to signal that we’re not in Kansas any more.
Beast giants and titans feel a bit redundant, but their appearance is certainly striking. Shadow Giants have intriguing mechanics, but you probably don’t want to have more than one of these in play at any given encounter. They can also be used in other settings without a lot of modification, as “undead giant with a grudge” is a pretty universal concept.
-
Let's Read the 4e Dark Sun Creature Catalog: Ghost, Raaig

A half-humanoid, half-skeleton, all spiky ghost. Copyright 2010 Wizards of the Coast. This post is part of a series! Click here to see the rest.
Athas is a world with plenty of horrible death in it, so of course it has plenty of ghosts.
The Lore
The ghosts we’re talking about in this entry are also called “raaigs”, so you can use that word when nomenclature is important and you want to distinguish them from wraiths, specters, or the specific D&D monster actually called a Ghost.
They are specifically the ghosts of priests and holy warriors that served the now-dead gods of Athas, and who met their demise while charged with protecting their holy sites and relics.
The typical encounter with a raaig will happen when the PCs enter the ruins of such a place. The ghost, still fulfilling its mission, will manifest and challenge the intruders to check whether they’re devout pilgrims or dastardly thieves. Since no one alive remembers the proper prayers and passwords to appease these spirits, they are likely to attack.
The Numbers
Raaigs have the full ghost package: ground and flight speeds of 6, Darkvision, phasing, insubstantial, immune to disease and poison. The book mentions they become corporeal for a moment when they attack, but this moment doesn’t last long enough to influence their stat blocks, which considers them to be insubstantial at all times.
They don’t have any weaknesses that let them become partially corporeal either, so the only way to deal full damage to a raaig is if you’re using the rules update that makes force damage fully affect all insubstantial creatures.
Raaig Tomb Spirit
Your common specimen as far as these very specific ghosts go. The Tomb Spirit is a Level 9 Soldier with 66 HP, which looks like a small number until you remember it will be taking half damage from everything.
The tomb spirit projects an aura (1) of Gripping Dread, which forbids enemies inside from shifting and deals 5 cold damage to enemies marked by the spirit who make an attack that doesn’t target it. This is a spooky version of the Paladin’s mark mechanic.
Its main attack is a chilling blade that deals cold damage. As a minor action once per round it can issue the Raaig’s Challenge, which targets Will, and pulls 2 squares and marks for a turn on a hit.
Raaig Crypt Lord
A higher-ranking guardian in life, the Crypt Lord is a Level 14 Soldier with the Leader tag and 96 HP. It’s mostly a Tomb Spirit with bigger numbers and improved abilities:
Its Chilling Blade deals more damage and marks on a hit; its Gripping Dread has a radius of 2; ts Challenge pulls 4 squares instead of 2.
The one new ability here is Ghostly Command (recharge 6+) which lets each undead ally within 5 squares of the lord shift 2 squares and make a basic attack. As this takes a standard action, it will probably be used to open the fight.
Raaig Souflame
This is the ghost of someone who was so favored by the gods in life that they retained a small spark of divine power after death. Their hold on this spark is tenuous, however, and it might leave them if they’re too damaged. In this case, they will be turned into desperate beasts full of grief and rage. This is a Level 21 Skirmisher with 138 HP and all raaig traits.
The idea here is that they lose the divine spark when bloodied, and so they effectively have two sets of abilities and movement speeds - one for when they have the spark, and one for when they don’t.
When “healthy”, the soulflame has a ground speed of 8 and a teleport speed of 3. It attacks with a Divine Blade that deals a mix of untyped and radiant damage and lets the ghost teleport 3 squares on a hit. It can get fancy with this and use it to perform a Flickering Phantom maneuver (recharge 5+): the souflame teleports 4 squares, makes a stronger than usual sword attack, then teleports another 4 squares and makes another, weaker attack. The teleports are effects, so they happen even if the attacks miss.
When bloodied, it loses the ability to teleport and gains a flight speed of 8 instead. Its main attack becomes a Deathly Blade whose added damage is necrotic instead of radiant, and which makes the target only regain half HP from healing for a turn. Its Flickering Phantom ability is replaced with Hollow Rage, an encounter power that deals heavy damage and prevents the target from regaining HP entirely (save ends).
Encounters and Final Impressions
The book says raaigs are intelligent and strong-willed enough to take command of most other undead that haunt their temples, such as skeletons, mummies, and other ghosts, so these will make up their allies in an encounter. It also reminds us that not all gods were good - protectors of evil temples might still have command of the devils or demons that also served its patron god. Souflames in particular are likely to attract surviving angels that served the same deity, as they are drawn to that faint spark.
This makes me think that a non-hostile raaig makes an excellent mentor and teached for the super-rare divine PCs of Athas. Maybe your cleric or paladin was trained by the soulflame who is the Last Priest of Pelor and who was aware enough to take the PC under their wing instead of treating them as an intruder.
And if angels and devils arrive to serve such ghosts, that’d be a big draw to someone who is researching a way into the Astral Sea, as I think that plane is not normally accessible from Athas.
-
Ultra-Tech Dungeon Delving in GURPS
I started writing this post a few years ago when I was GMing the Iron Gods adventure path for Pathfinder using the Dungeon Fantasy RPG rules. My approach to that campaign was pretty slap-dash, and after I stopped I began thinking of a more structured way to do it. Since a recent comment here on the blog asked for specifics, I though I’d dust the post off and publish it.
Let’s say you have a Dungeon Fantasy game where you want your characters to get into contact with more advanced technology. How would you go about it?
Ultra-Tech Delving: A Survey
Steve Jackson games did a little foray into this area in Pyramid #3/60, in an article entitled “High-Tech Dungeon Crawl”, which focused on bringing modern-day characters with guns into fantasy dungeons to mow down orcs with autofire and take their stuff. This raises the inherent level of colonalism in the genre from “concerning” to “yikes!”1.
What I want to focus on here is in an older variation on the theme: fantasy characters exploring “dungeons” filled with elements you might be more used to seeing in science fiction stories. When I say “older”, I mean it’s older than D&D: Dave Arneson’s Blackmoor campaign featured a whole ultra-tech city-state descended from the crew of a crashed spaceship, and it was played for several years before what became the OD&D rules were finalized and officially published. D&D proper would explore the same territory with its famous “Expedition to the Barrier Peaks” module.
Pathfinder dedicates a whole kingdom in its setting to the idea: the land of Numeria is a barbarian kingdom where a giant spaceship crashed millenia ago, breaking up during atmospheric entry and scattering its many modules all over the region. And, of course, in Gamma World and other post-apocalyptic games all “dungeons” are ultra-tech because they’re the ruins of the futuristic civilization that preceded the apocalypse.
Ultra-Tech Delving in GURPS
GURPS is of course a uniquely well-suited system for this kind of thing. Its rules already support a wide range of genres and technology levels from the corebook onwards. We only need a few adjustments depending on the sort of campaign we want.
After The End already deals with the post-apocalyptic angle and offers a set of detailed rules. What I want, however, is something simpler and more suited to a Barrier Peaks/Numeria scenario. The ultra-tech stuff is alien, but characters can gain an understanding of it with some investment, and the gap between their usual medievalish milieu and the lofty heights of alien tech isn’t completely impossible to cross. How would I do it?
Tech Level, or the Lack Thereof.
So on one side we have the usual “medievalish” dungeon fantasy setting. In GURPS, that’s roughtly TL 4, but without gunpowder. On the other side we have a space-opera intrusion, which corresponds very roughly to a TL9-10 selection with a few outliers (personal shields are TL11-12, but they fit the flavor). With these vague numbers in mind, we can ditch the concept of Tech Levels completely for our treatment!
Default GURPS Tech Level rules are only useful for giving us a starting set of gadgets to work with. In actual play, the only thing that matters is if a given thing is “low-tech” and thus familiar to everyone, or “high-tech” and thus a mystery to the uninitiated. How to differentiate both? With the following advantage:
Tech Familiarity (10 points)
You have a layman’s knowledge of the basic principles behind the advanced technology scattered through your otherwise medieval fantasy world. You understand why it isn’t magic. You know about electricity and how it powers high-tech devices. You grasp enough of the high-tech design aesthetic to easily spot a device’s charging port or battery, its control surfaces (be they switches, triggers, or touchpads), its information displays, and its business end even if you don’t know what the thing actually does. You can identify the high-tech civilization’s writing even though you can’t read it, and you can identify its iconography for “danger”. You can also recognize hazards like exposed live wires, recognize which type of power cell goes into a device, and plug it in.
This is a form of Unusual Background that makes you immune to the sort of amusing accident which plagues other low-tech explorers confronted with high-tech devices.
More importantly, Tech Familiarity is a pre-requisite for learning high-tech skills, and the language of the high-tech civilization (if any). With this advantage, you can spend points on those things normally.
Yes, this is quite similar to High TL from the core book, but much cheaper. The reason is that paying 30-35 points in High TL to get the same benefits is way too expensive for a campaign in this mold. This advantage doesn’t give you any familiarity with deeper aspects of the high-tech civilization, just what’s in the first paragraph.
Tech Skills
Skills that would require a /TL specialization in standard GURPS rules have only two versions here: standard (no suffix) and “/Tech”. That way, you don’t need to change anything about how you write down a standard “medievalish” character.
The two specialties don’t overlap at all: they don’t default to each other, and can’t be used at all across the “tech divide”. If you only have standard Lockpicking, you can’t open a high-tech door with a magnetic lock. If you only have Lockpicking/Tech, you can’t open low-tech mechanical locks with old-fashioned picks, tough you might be able to operate a machine that does it for you.
High-tech weapons are usually firearms of beam weapons - the skills to operate them properly are always “/Tech” skills. High-Tech melee weapons are a possible exception to the “no defaults” rule above, though the GM would need to rule on each case:
Weapons that use the same skill as their low-tech counterparts can be used normally by anyone if the only difference is in their construction (such as a superfine or hyperdense blade). If they have some additional feature that requires power (such as a vibroblade or shock baton) then the character has a -2 penalty to use that feature unless they have Tech Familiarity. If they require an exclusive skill to operate (like a force sword or monowire whip) then that skill has the “/Tech” suffix. You might be able to get away with a default to a low-tech skill here, but the only way to improve on that is to buy Tech Familiarity and the high-tech skill.
Ultra-Tech Gear
With the character stuff out of the way, we can talk about the goodies! As I mentioned above, one advantage of GURPS is that it has entire books of high- and ultra-tech gadgets that can be plugged straight into your fantasy campaigns. Therefore, we don’t need to talk about how to stat this stuff up at all! What we do need is talk about the effects it’s going to have on your campaign, which in turn will aid you in selecting which items to include.
How much is this stuff worth?
A vital question in the dungeon fantasy genre! Going more or less by the book, high-tech items should be worth roughly 30 times their list price in a dungeon fantasy setting. That makes even a relatively innocuous gadget into a major piece of loot!
This might seem a bit too much for a dungeon fantasy setting where magic and magic items are relatively common, but I think it kinda makes sense. Ultra-tech items are going to be a lot rarer than magic items, particularly in settings where they come from that single crashed spaceship. They work regardless of the local mana and sanctitiy levels. And they can be enchanted! These are exactly the same reasons why a suit of fine plate armor costs more than a standard suit enchanted with Lighten 1.
Example: A superfine broadword would cost $3600 in its native ultra-tech society. Recovered from a crashed spaceship in a dungeon fantasy setting, it’s worth $108,000!
That sword gives a +2 bonus to damage and a (2) armor divisor. The closest “low-tech” equivalent would be a very fine sword with a Penetrating Weapon enchantment, worth $17,000, almost ten times cheaper. Even if all the bonuses were from magic, it would still cost only $25,600. However, the superfine blade will lose none of its functionality in a low- or no-mana zone, and it could be enchanted with the same magic as the low-tech sword to become even better.
If you do think that this is too much, you could say that the value of ultra-tech gear is capped by the value of magic items with similar properties. The sword from the example would be worth $17,000 then. Gear that has no magical equivalent might still use the “uncapped” price.
Timeworn Gear
One concept from Pathfinder that’s useful to borrow is that of timeworn items. In Barrier Peaks-style setups, most of the high-tech stuff the PCs come across has been sitting around in derelict ruins for a very long time; even if it was very well-built, it might not have withstood the passage of the ages intact. To model that, we introduce the following equipment modifier:
Timeworn: This can be applied to any high-tech armor, weapon, or device that requires power or ammunition to function. These items can’t be recharged. After whatever reserves they contain when found are used up, they’ll break down and become useless. They may also have other quirks arising from their almost-broken state at the GM’s discretion. Divide final price by 10.
Weapons and Armor
Weapons and armor deserve special mention because Dungeon Fantasy is a combat-heavy genre, and this combat has a very specific “feel” to it. Therefore, high-tech combat gear will have an outsize impact on it.
Baseline Dungeon Fantasy suggests that PCs should have a maximum total DR of about 15, as anything more than that will make them invulnerable to too many monster attacks.
PC damage also has some upper bounds. Spellcasters with missile spells and a spellcasting talent of 6 can do a maximum of 18d damage, though that requires enough setup to only be possible about once per fight, and not on all fights. The maximum amount of “at-will” melee and ranged damage a PC can do is equivalent to about 7d per attack23.
Introducing ultra-tech armor into the game almost certainly means you’re going to exceed the DR cap. Even non-combat safety gear at these tech levels has as much DR as low-tech plate, while being much lighter. Proper combat armor is much tougher. Most of the published DF enemies will have trouble getting past the DR of a PC in full ultra-tech armor with their physical attacks.
Similarly, high-tech weapons can change the shape of combat in your campaign. Dungeon Fantasy usually considers melee to be the main event and ranged combat to be a specialist niche, but if guns and beam weapons are common these two are going to swap places.
Ultra-tech melee and ranged weapons can also allow PCs to approach or exceed the upper damage bounds described above much more easily. Both “boundaries” are roughly equivalent to rolling 7d of damage per attack. A force sword does 8d; a laser rifle does 6d, and can can fire many more shots per turn than a bow with no penalty. Both of those have armor divisors too, which make enemy DR become much less of an obstacle.
The first step when addressing these issues is to carefully consider which items are available. What do you want your campaign’s new DR cap to be? What is the highest armor divisor you’re comfortable with? What sort of maximum damage do you want your PCs to do with a melee or ranged attack they can use every second? And, to quote Mister Torgue from Borderlands 2: EXPLOSIONS?
The second step is to consider the same thing from the side of the opposition: what’s the highest DR and damage you estimate they will be able to routunely bring to the table? The gear available to the PCs should give them a chance to match those figures.
You can then safely remove anything that exceeds your new planned limits. That will end up giving you a pretty good set of guidelines for what the ultra-tech culture and their ruins look like. A civilian medical lab infested with non-sapient monsters and low-tech looters might have plenty of medkits and wonder drugs, but no weapon heavier than a couple of timeworn electrolasers and some scalpels the thief can use as superfine daggers. For a military base filled with killer robots and with a tank at the end as a boss fight, the sky is the limit, though those anti-tank weapons might all be timeworn if you don’t want the PCs using them outside.
-
The article itself includes a section titled “The Sociological Ramifications are Appalling”. ↩
-
A ST 20 Knight with Weapon Master and a halberd can easily attack twice every turn and do 3d+13 per attack. This is theoretically possible right out of character creation if your knight is a half-ogre. ↩
-
A ST 20 Scout with Weapon Master and Strongbow might be able to shoot once per turn and do about 4d+10 per shot. This particular boundary is hard to reach, so your highest “at-will” ranged damage will probably be less than that. ↩
-
-
Let's Read the 4e Dark Sun Creature Catalog: Gaj
A gaj perched on a desert rock. Copyright 2010 Wizards of the Coast. This post is part of a series! Click here to see the rest.
The book opens this entry by that the wastelands of Athas “sometimes spawn monsters so terrible not even the merciful can permit them to live”. Cheery.
The Lore
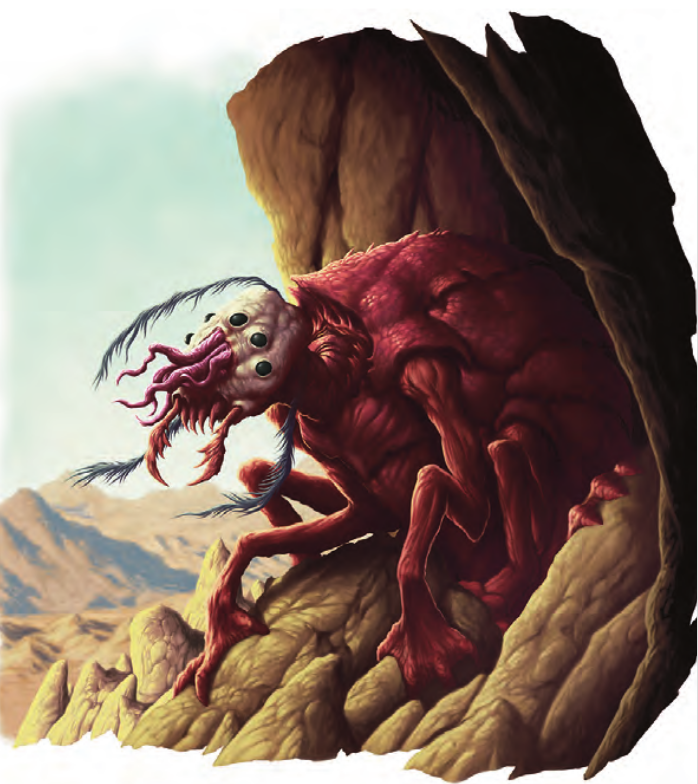
The illustration makes me think a gaj is what you get when you mix a mind flayer with a beetle. These aberrations have human-level intelligence, strong telepathic powers, and a taste for the flesh and fear of sapient creatures. They’re too anti-social to practice infiltration like mind flayers sometimes do, but there’s still a lot about them that’s familiar.
Gaj dwell in extensive burrow networks that technically form a community, but they rarely interact with each other. They’ll band together to defend their home, but they mostly hunt alone or in mated pairs. They attack their prey with their claws and mandibles, and with invasive telepathy focused through their feathery antennae. Once a gaj has a firm grip on a victim, the touch of those antennae will rapidly disassemble the creature’s mind and use it to fuel further psychic assault.
Certain specimens mutate to assume a sort of leadership role in a gaj community. Their powers specialize on inflicting pain, and they take upon themselves the job of keeping victims captive in the burrow as dominated slaves and/or reserve rations for lean times. These Pain Tyrants are one of the few things that can get a whole burrow together for a bigger hunt or a raid against a settlement.
In really lean times, when gaj cannot find new victims and have already devoured all of their captives, they’ll turn on each other - even their own mates.
Ironically, just as gaj like to hunt other sapients, so are they hunted in return. They’re very popular in the arena, so those ubuquitous slavers often mount expeditions to find and capture them.
The Numbers
Gaj are Medium Aberrant Magical Beasts with a ground speed of 6, a burrow speed of 3, Darkvision, and Tremorsense 5. Their signature trait is Warding Shell, which gives them +2 to defenses against any creature marking them.
All of the stat blocks here are Chaotic Evil.
Gaj Mindhunter
This is the typical specimen, so named to distinguish it from the Pain Tyrant. Mindhunters are Level 8 Elite Controllers with 172 HP. Their basic attack is a bite with their Mandibles, which grab on a hit. Once the mindhunter has a victim in its jaws, it can only use this attack against it, and not against others.
Its Invasive Presence has no such restrictions. It’s targets one or two creatures within Range 10, deals psychic damage on a hit, and pushes 1 square. There’s also Mind Wrench (recharge 5+), which targets a creature within a Close Burst 3 and dominates on a hit (save ends). Each time the target fails the save, the mindhunter’s grabbed victim takes 2d6 psychic damage.
As a minor action, once per round, the mindhunter can use its Feathery Probe on the grabbed victim. On a hit this deals light psychic damage, 5 ongoing psychic damage, and dazes (save ends). If the target is already taking ongoing psychic damage, that damage increases by 5. Yes, repeated hits with this attack will result in more and more ongoing damage.
All of this paints us a picture of the mindhunter’s preferred tactics: choose a victim to bite and grab, get away from the PCs, and keep using Invasive Presence and Mind Wrench to keep them busy while they nom on the victim with Feathery Probe.
Gaj Pain Tyrant
Pain Tyrants are considerably stronger than mindhunters, being Level 13 Elite Artillery with the Leader tag and 200 HP. Its Mandibles have no special effects other than damage. Its ranged basic attack is a Mind Shriek with range 20, that targets 1-2 creatures, and on a hit deals psychic damage and dazes for a turn.
Less often they can use Agonizing Insight, an Area Burst 2 Within 20 with a lot of complicated effects. This weaponized anxiety attack inflicts 20 psychic damage on a hit (save ends). Whenever the target takes this ongoing damage, each of its allies within 3 squares also takes 5 psychic damage. So, if it hits 3 PCs, in the next round each of them is going to take a total of 30 psychic damage if they stay together: 20 from the main effect, 10 from splash damage. It recharges when the tyrant scores a critical hit with Phrenic Probe (see below).
As an effect the attack also makes each enemy inside the burst grant combat advantage for a turn even if they weren’t hit by the main attack. It also lets allies in the burst use a free action to either shift 1 square or move half their speed.
Against a dazed target, the Pain Tyrant can use Phrenic Probe as a 1/round minor action. This is a version of the mindhunter’s Feathery Probe that has range 20! Finally, Vicious Goad lets an ally within 20 squares move its speed and make a basic attack against an enemy of the tyrant’s choice as a free action. The ally is then dazed for a turn.
Encounters and Final Impressions
Looks like the most common gaj encounter in the wilderness is a pair of mindhunters. A Pain Tyrant leading a larger group is also possible, but in this case I’d recommend making the accompanying mindhunters into regulars of a slightly lower level than their boss. Enslaved humanoids can round out the group. And you can also find mindhunters being used as arena fighters.
These seem to be very tricky to fight.
subscribe via RSS