Posts
-
Hell's Rebels Bestiary: Asmodean Redactor
Part of the Bestiary for my solo Hell’s Rebels game.
Redactors appear during the capstone delve of Adventure 01, and first show up in our playthrough in Scene 13. In this appearance they’re kinda sitting at the edge of the “fodder” and “worthy” categories, since they’re only dangerous to the party in large numbers. As you might expect, they don’t really show up after this dungeon.
The Lore
Those who fail to learn from history are doomed to repeat it. The Chelish government and the Church of Asmodeus take this proverb so seriously they have a whole department dedicated to prevent people from learning anything from history.
Redactors are trained to pore over important documents, particularly those containing historical knowledge, and remove anything that makes their bosses look bad and any hint that they can be defeated. They’re also trained to stab people to death, because sometimes that’s the only way to prevent a bit of incriminating knowledge from spreading, or to get that sweet promotion.
The Numbers
The original had them as level 1 monks who punched people to death, but I decided to give them knives instead. I play them as Worthy opponents, which means they have to be reduced to 0 HP before they’re out, but their crappy gear does put them right on the line between that and fodder.
Still, these murderous librarians have clearly spent a lot more training time on the “murderous” part. You don’t need to be a master scholar to apply thick strips of black ink to paper containing banned words.
Asmodean Redactor
ST 10; DX 14; IQ 11; HT 12.
HP 10; Will 12; Per 11; FP 12;
SM 0; Speed 7.00; Move 7.
Dodge 10; Parry 11F (Judo); 10F (Knife).
DR 0.
- Long Knife (14): 1d-1 cut or imp; Reach C, 1.
- Punch (14): 1d-2 cr; Reach C.
- Kick (14): 1d-1 cr; Reach C-1.
- Judo Grapple (14): 1d-2 ctrl; Reach C.
Relevant traits: Combat Reflexes.
Relevant Skills: Knife-14; Karate-14; Judo-14; History-12; Stealth-14;
Equipment: Robes, long knife.
-
Let's Play Hell's Rebels A01S13: Hocum's Fantasmagorium
Intro
In the original book, Rexus was going to take seven weeks to translate the documents from the Livery trove, giving the party a chance to run that many strategic turns, run the original set of filler missions, and deal with Blosodriette’s shenanigans.
Here, me-the-player took care of the imp more or less immediately (with a little nudge from me-the-GM). And three game weeks in, I feel I’ve run through all the filler missions I cared about, and our revolution is now pretty close to the maximum level it can reach in this adventure.
So I think we can move on to our finale earlier. We just say Rexus finishes his translations now, allowing us to move to the finale.
[GM] Thinking About Dungeon Preparation
And so as the GM in this story, I must also prepare my dungeon. This dungeon is the capstone delve of the module, so it’s quite extensive compared to everything else we’ve seen so far. It has two distinct levels with several rooms each.
While I think I am getting better at it I’m not sure I really enjoy the process of preparing a dungeon delve in Foundry. Not unless there’s something else in there to hold my interest other than just trying to copy the book. There was a pause of a few weeks between me writing the first sentence in this section and the rest of it, and I procrastrinated by publishing everything up to scene 05 of the adventure to the blog.
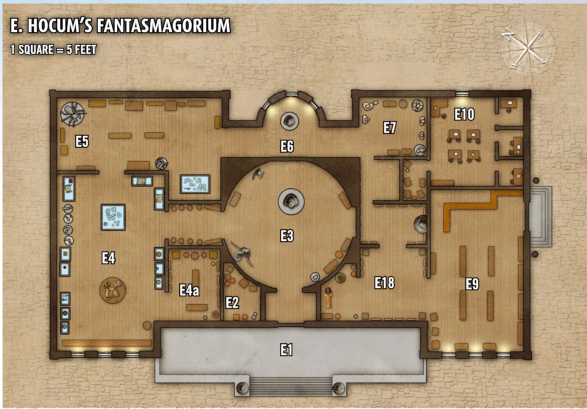
Before that pause, I managed to extract a proper map of the first level from the same old module that gave me the Livery map from Scene 05. I drew walls, and I think I did a decent job of adding proper lighting on it. Nothing fancy, just a slightly dimmed global light level. If that turns out to be a problem, I can just disable that and rely on pure imagination to handle lighting and walls. My player, who is also me, is very understanding about these things.
Were I running this for other people, the correct thing to do would be to adapt the whole level at once, statting up every trap, every hidden treasure, and every monster in GURPS. After all, there’s no telling where the PCs would choose to go and they’re supposed to take at most a couple of all-afternoon sessions to go through each level. I can’t exactly stop the world to “compile” the dungeon room by room.
But I’m running this for myself. I can do exactly that. My “sessions” are whenever I have 30 minutes to a couple of hours to spare and “prep work” is supposed to have the same importance and fun value as “planning”, or at least it’s supposed to. Let’s take that approach. Everything is going into the same file, but ideally each “session” would involve choosing the next room the PCs visit, preparing it, and then playing through it.
That would mean we have more frequent sessions and maybe actually get through this faster, because the thought of preparing a whole level at once terrifies me into inaction, as previously demonstrated.
[GM] Dungeon Overview
We have two levels here with distinct traits.
Level 1 on the surface is Hocum’s Fantasmagorium, which was abandoned 70 years ago during the Chelish Civil War. The place had been stealthily maintained by the Archivists, so despite the ruined state of its exhibits the building is structurary sound.
This level is currently secured by a few reanimated skeletal exhibits, by zombies created from the corpses of victims of the Night of Ashes (including Rexus’ parents), four redactor monks, and one asshole priest. There was another but he died of greed.
Exterior walls and doors are heavy wood (DR 3, HP 33). Interior walls and the boards covering the windows are average wood (DR 3, HP 29). Door locks and hinges are heavy and high-quality (DR 9, HP 18, -5 to Lockpicking) but the mithril key can open all of them.
During the day, the Fantasmagorium is dimly lit by sunshine filtered through the boarded-up windows (-3 Darkness penalty). At night, it’s pitch-black. Areas where human enemies are working are brightly lit (+0) by scattered Continual Light lanterns.
There’s some treasure scattered around this level, most of it in the form of loot from the two priests’ bodies.
The Aroden statue in the center-north part of this level is a secret door to the Archivists’ underground base, the Many-Steps Monastery.
The Many-Steps Monastery is secured by a summoned scrivinite, a large group of Asmodean redactors, a big ogre brute, plus Mephiry and Nox. The layout is effectively a gauntlet that funnels the party through the bulk of these forces and into a confrontation with Nox.
Interior walls are 6-inch thick stone (ablative DR 78, HP 75). Doors are identical to the ones up top, and the mithril key also opens them all. The entire level is brightly lit by Continual Light spells.
Aside from Nox’s loot, most of the treasure in this level consists of recovered Archivist documents that can be sold to collectors.
[Player] The Silver Raven Documents
Rexus is done with his decryption of the document cache retrieved from the Livery, so the Ravens spend some time going over the documents. Some of what’s in there is ironically already known to our PCs, as Jade personally knew the Ravens and could tell the others about the basics of who they were.
But she was too young to actually take part in operations, so there’s still new stuff to be had here. The Ravens were successful in preventing the conquest of Kintargo and Ravounel nearly a dozen times during the Chelish Civil War: five attempts by various power-hungry noble families, four attempts by House Thrune specificially, once by vampire priests from Nidal, and one by the dragon Rivozair.
The fifth attempt by Thrune was the one they felt they couldn’t fight, at least not without destroying the land and city they were trying to protect. So the group decided to surrender. Jade remembers this one - it’s when she was sent away.
The documents also say their main headquarters was under the Opera House (which Barzilai is currently using as his home), and that their main tool in defending the city was something called “The Song of Silver”. Jade remembers this is an actual song with magical powers, but again she was too young to grasp more details. Rexus believes the score and lyrics for the song might still be out there - finding them would be a major boon to the revolution.
Last but not least, all the operational advice in the papers gives the new Silver Ravens a permanent +2 to all three organization traits. I’m keeping track of it in the org sheet, and will post the updated version on our next strategic turn.
[Player] Hocum’s Fantasmagorium
Rexus tells the group that translating the documents has left him with a strong conviction that his parents might still be alive. He knows the Archivists kept a hideout under an abandoned museum named Hocum’s Fantasmagorium, and that among the things his mother had Urist deliver him was a small mithril key that he knows will open the way to the hideout.
He thinks his parents and other survivors from the order might still be hiding under there, and are in need of help.
Urist… kind of agrees, but he’s not as optimistic. When he returned to Kintargo from his away mission, he approached the Fantasmagorium but noticed that all of the pre-arranged telltale signs on and near the surface building were flipped to “danger”, so he never tried to get in. He still thinks the group should go there in force, but he doesn’t think they’ll find the place intact.
This ends their meeting in a kind of somber note, and they get to preparing for the delve.
[Player] Delver Preparation
Supplementary Actions
If we had managed to acquire one team of Spies or Saboteurs at this point we could have used a Covert Action to get a basic layout for the Fantasmagorium, or a Sabotage action to rig a trap on the main door to catch fleeing enemies.
We slacked a bit on the team upgrade front, so we can’t do either of those.
However, I am going to “cash in” the biggest story benefit from Urist’s origin as the Last Archivist here. He’s been here before, though not since before the place was raided. So he knows and can share the entire layout of both the Phantasmagorium and Monastery levels, retrieved from the but he has no idea about the number and disposition of the enemies inside.
This means he does know how to open the secret passage to the Monastery. The party could go right to the second level and skip all the opposition here if they wanted to.
However, They don’t want to. We’re going in there to clear the monastery of Asmodeans.
Tactical Planning
Let’s do this the same way we did back in Scene 08, by looking at the characters’ personality traits and figuring out what approach they would prefer and how they would argue for that with the others.
As mentioned above, they know the detailed layout of both dungeon levels, and they have a magic key that opens (or locks!) every door in the dungeon. Rexus gave them that, along with a request to go in there and look for Archivist survivors. But this planning session is being held without him.
You see, Urist believes that if any other Archivists remain, they wouldn’t be there. There were secret danger signs posted around the place, which caused him to turn back when he went there alone. This means that someone else might have escaped, but it also means that the hideout isn’t empty. The place is likely full of Thrune lackeys of some description.
As he lays all of this out to the rest of the group, he proposes a new “main” goal: get those fascists out of there, with maximum force. Even if all other Archivists are dead, there are things in there that should not fall into their hands.
-
Arcturus, who is Impulsive and Overconfident, obviously thinks they should kick in the front door and fight the whole enemy force head on. It’s a perfect plan! Nothing can go wrong with it!
-
Jade advises a little more caution. She thinks this is likely to devolve into a big fight anyway, but there’s no reason to give up the element of surprise so early. A quick, decisive, and stealthy raid is the way to go here, trying to catch at least some of the enemies unaware.
-
Jania doesn’t think any forces remaining there would pose too much of a problem to a group like theirs, but she believes being clever and sneaky is part of what makes them so strong. And that she provides that cleverness and sneakyness, of course. There’s no reason to make things harder than they need to be, so she thinks they should maintain surprise for as long as possible.
-
Rosalia just wants the rest to pick a door and go in, and says they’ll adapt as they go along. She knows the opposition might be strong, but she’s not big on memorizing complex plans.
-
Urist, on balance, agrees with Jania. He’s confident in the group’s ability to handle the opposition but he’s spent a long time with an organization that values wisdom and prudence.
In the end, they end up agreeing on the stealthy plan. Scout out the best entrance, try to stay sneaky for as long as possible, go loud once the fighting starts in earnest.
Equipment Acquisition
The PCs actually have very little in the way of personal funds, since they dumped most of what they had into the organization. So our shopping spree here is very anticlimatic.
Rosalia buys a second pouch and 12 paper cartridges of pistol ammunition so she can finally use her Gunslinger trait with the pistol we found a while back. That costs her $16. You might remember she made a note to do this “as soon as possible” back in Scene 06.
Urist and Jade spend three silvers ($60) to buy a couple of light vials.
Next, I will distribute some of the potions they have stashed in the Wasp Nest here.
-
Rosalia leaves the guitar home for this one, and gets the Healing Gem.
-
Urist and Jania each get 1 vial of Paut.
-
Jade gets 1 minor healing potion and Art gets 3.
-
Urist will carry the 2 vials of Universal Antidote.
Point Expenditure
So far I’ve spent some of our team’s earned character points to make them better at directing the rebellion, but now I feel the need to spend what we have stashed in making them better delvers, following the wishlists from their published starter sheets and their current delving plans.
-
Urist has 8 points. Let’s spend 1 to improve Hidden Lore (Demons) to 14, 2 to buy Physiology (Demons) at 13, and the remaining 5 to get Higher Purpose (Slay Demons) 1.
-
Art has 8 points. He improves his Lifting ST to 2 for 6 points, and his Knife skill to 17 for 2.
-
Jade has 6 points. I want to save until I can get an extra point of ST for her, so she won’t spend any here. That’d be 4 more points.
-
Jania has 5 points. While I really want to save for another level of Spell-Thief Expertise, I think we must acquire Trace and Glass Wall for this delve, so we spend 2 of those points.
-
Rosalia has 5 points. Her primary wishlist item was getting a gun and ammo for it, which we have now, so let’s spend 4 of those points on Guns (Pistol), and one on Off-Hand Weapon Training (Pistol).
[Player] Delving Hocum’s Fantasmagorium
With Rexus’ mithril key in hand, the Ravens can finally raid the monastery. And a raid it will be, as they don’t just want to look for survivors, they want to send an even stronger message than the one from the Salt Works rescue operation. The Night of Ashes will not go unpunished.
Mechanically, we’ll still be using the mechanics from my Old School Movement post, but they will be moving at five times the default pace since there will be no mapping. This means our exploration turns will be 2 minutes long, and they can spend a turn to either search a room or to move up to 40 meters. They automatically roll to detect traps, secrets, treasures and enemies during their movement.
The mithril key will be used to open any locked doors, as Urist assures the others it fits every lock in the hideout. It will also be used to lock any doors they go through as they leave cleared rooms.
There are two doors into the Fantasmagorium, the front entrance and the gift shop exit to the side. Which one will they use to enter? I make a d2 roll, 1 is front entrance 2 is gift shop. I get a 2. Gift shop it is. That’s Area E9 on the book’s map.
We’ll assume the party managed to get here without incident, as I want to get the main event started. They sneak up to the door and Jania casts Glass Wall on it (all related tests succeed). She immediately sees that the door is boarded up, and though the boards block her vision, she can see there are people milling about in there.
Still riding on their Stealth success, the party instead goes around to the front door, where Jania drinks a vial of Paut and tries Glass Wall again. This door is unblocked and there seems to be no one on the other side, so they quietly unlock it and enter. And now we’re really on.
Turn 1
The door leads to a small empty anteroom with an open door to the left and a grand passage to the front, leading to a hall full of exhibits. Daylight spills in from the opened front door, but further in the interior is dim. Jade and Art activate and begin wearing their previously purchased light vials.
The party enters and Jania and Art quickly check the small side room. Art of all people immediately spots a few coins and a ring half-buried by the dust on the floor, and Jania scoops them up. She can sense the ring is magical but will await until they’re out before doing any further analysis.
Turn 2
The whole group proceeds to the big round room (E3 on the map). It’s full of skeletons and crumbling taxidermied animals posed in menacing ways, and a midling quality fresco full of monsters adorns one of the walls. Before they can examine the place further, two of those skeletons, which look like they belonged to very large apes, animate and attack!
Jania quickly hides behind Arcturus as the two large skeletons charge the group, flailing their clubs and limbs around. One engages Urist, and the two become locked in combat. The other engages Arthur, who parries the skeletal arm swinging the club.
The wrestler holds fast and uses the leverage to deliver a devastating kick to the monster’s rib cage, all but shattering it. Jade finishes it off by decapitation.
Urist continues to defend himself against the remaining skeleton as every other PC closes in on it. Rosalia steps to its flank and hits its left leg with her saber, causing the creature to wheel around to attempt to hit her and lose its balance, making it easy prey for the rest of the party.
They take a moment to breathe and decide on their next move.
Turn 3
There are three doors leaving this room, aside from the one they came in, and only the “map west” door is open. Our want to clear the place of Asmodeans and so they decide to move through the open door and lock it behind them, going through every room in the complex.
This leads them to a large exhibit of marine animals. It’s full of skeletons both mounted and accidental, as it used to contain several aquariums with live specimens that dried out decades ago. There doesn’t appear to be anyone here, so the group takes the open passage to “map north” (to area E5).
(GM: They wouldn’t have met the undead ningyos here since they only rise at night, but I decided to remove them anyway. This filler figth is an awkard fit for GURPS.)
Turn 4
The party moves into Area E5, the Insect Exhibit. There are many terrariums here filled with ruined environments and the shells of dead bugs.
There’s also a bunch of taxidermied giant insects mounted around the place, including a giant spider that reaches almost to the ceiling. And a dessicated dead body wearing Asmodean armor with its skin full of red welts fallen by a broken terrarium on the north wall.
The party doesn’t have time to speculate any more before the eight juvenile giant spiders responsible for his death scuttle from under the furniture and move to attack them.
(GM: The book calls these Scarlet Spiders. Here, they’re Big Spiders from DF Monsters p.32. They’re actualy quite a bit more dangerous than the originals, but I feel this might be a better challenge for our DF delvers.)
The spiders are quite large, and reddish in color. Starving, they charge the party right away, attempting to bite them, though the PCs largely fend off this initial clumsy assault. Jade kills a spider with her sword, while Arcturus squeezes another to death, but the creatures prove too agile for the rest of the party to hit just yet.
With the spiders stuck in, their attacks become more careful and precise, forcing our heroes to retreat to avoid their bites. There isn’t a lot of room amid the terrarium displays, so they cannot keep doing this for long. One of the remaining spiders manages to briefly jump on Arcturus’ back and bite him, but its fangs fail to penetrate his scale armor. Whew! Before any of the others can get lucky, however, the party manages to kill them all. Most of the work is done by Jade’s sword and Art’s stompy boots.
Turn 5
The party spends the next two minutes searching the room. Jania finds out that the spiders likely came from the shattered terrarium to the north. There are traces of a long-term stasis effect on it, something so expensive to set up the wonders if it wasn’t the reason the Fantasmagorium went bankrupt. It held a very large amount of giant spider eggs, which have all hatched.
The newborn spiderlings were probably responsible for killing the Asmodean cleric on the floor. And then they spent a while eating each other until only the eight survivors were left, having reached a larger size. She doesn’t know, and doesn’t particularly care, why the Asmodeans in the building chose to leave their dead buddy lying there. All she cares is he has plenty of loot.
A comemorative Fantasmagorium gold-plated medal clutched in his hand, a money purse, a scroll belt with several magical scrolls, and a suit of armor that pings her magic sense. She takes the scrolls, and makes a mental note to come back later and take the armor.
(GM After conversion, the souvenir medal is worth $250, and and the money is 19 silver coins ($380). The scroll belt is the one from Adventurers: $60, 0.5kg holds 10 scrolls. The scrolls are all universal and charged: Panic (Spells p. 55, 1-hex radius, $400); Bravery (Spells p. 53, 2-hex radius, $400); Curse (1 point, Spells p. 51, $300); Deathtouch (2d, DF spells. p 20, $200).)
Turn 6
The party resumes exploration, heading east through Area E6. Urist knows the entrance to the Many Steps Monastery is below the statue of Aroden prominently displayed here, but the PCs decide to leave this for later. They know there’s a large group of Asmodeans on this level and they want to clear it before going down.
They proceed to area E7, a wax museum with statues of varying quality. One of them is of Professor Mangvuhne, the infamous Temple Hill Slasher who was found out and executed 116 years ago. They can only tell because of the name plate, as the statue’s face was mostly disfigured.
They notice some movement in the rooms ahead, so they stop for a while to prepare.
Turn 7
Jania takes the opportunity to search the room and notices that the remaining eye on Mangvuhne’s face seems to be some kind of worked semiprecious stone, so she spends a bit of time removing it. It’s a work of art, and worth a pretty penny.
She then decides to spend her newly acquired Deathtouch scroll here, casting it on her cane to save time in the fight ahead. The rest of the party all prepares their weapons, and they begin the process of sneaking to area E8.
(GM: At this point I prepared the enemies for areas E8 to E10 because this is going to turn into a major slugfest with all of them if combat breaks out at any of those areas.)
Turn 8
Jania sneaks ahead, and manages to spot two of the zombies in area E8 without being noticed. She doesn’t spot the others because they’re off in the little side room to the left, on the other side of the wall she’s hiding behind. Still, she signals the rest of the party that there are enemies ahead.
They also know there are more enemies on the room after that, so Jade guesses it’s time to go loud. Urist casts Armor, giving himself an extra +2 DR, and they march forward. The zombies see them coming, but don’t seem interested in leaving their assigned room. The fight starts as soon as our heroes enter, and the PCs spot the extra three zombies as soon as that happens too. No one is surprised.
Rounds 1-3
The party begins fighting the zombies, who try to grapple and bite them in return, with little success. The sounds of the fighting alert the redactors next door, who quickly spot the battle through the open passage from their room and begin shouting to warn their boss about the intruders.
Raul, the cleric in charge of the redactors on this level, exits his office and yells at the monks to go kill the intruders already. They draw their knives and run towards the PCs, arriving within melee range after the party has destroyed four of the five zombies.
One of the redactors tries hitting Jade with a fancy kick, and gets his leg crippled for the trouble. She finishes him off right after this. Meanwhile, Raul struggles to catch up as he was both more heavily armored and farther away.
Rounds 4-6
The remaining three redactors do only a little better than the zombies. They’re more agile, but also more fragile. Jade quickly wounds one and kills another, with Urist finishing off the first one. The third manages to stab Jania and wound her, prompting Jade to do a Heroic Charge across the room and kill him. Raul has time to arrive and cast a Deathtouch spell on his mace, but Art begins grappling with him before he can swing it. He is now the only enemy left standing.
I could continue the fight here. Raul has a full energy pool and might be able to do some damage before the PCs take him down. But the original adventure emphasizes that he’s a coward. In Pathfinder he has 21 HP and surrenders unconditionally when he reaches 5. In GURPS, where he might be taken down with a single turn’s worth of lucky attacks, I think it makes sense for him to surrender right now. Plus there’s plenty more dungeon below and I want to get to that. So we can call the fight right away.
Turns 9-10
Raul surrenders and begs for his life. After some discussion, during which Rosalia uses her Healing Gem on Jania, they end up accepting the surrender. None of them like Asmodeans very much but they also don’t like killing surrendered opponents. The party strips him of his gear and possessions, which include a magic mace and a magical suit of armor, a gold unholy symbol, a bag of gems, and the ancient book he was studying in his office at Area E10.
The party ends up locking Raul in the office, after checking that he can’t escape through the boarded-up window. His gear and treasure they store behind the counter here, to take home later.
No one picks up his armor or weapons right now, as they don’t want to use gear festooned with Asmodean marks. They’re going to stash them in Area E9 for retrieval and “cleaning” after they’re done with this place.
Turn 11
Once again ready to proceed, the party returns to Area E6, where Urist uses the secret combination on the mechanism disguised by Aroden’s statue and opens up the stairs to the Many Steps Monastery.
This concludes this level of the dungeon, and this scene of the adventure. We’ll make a new one in our next post.
[Player] Loot Tally
- Money:
- 22 silvers ($440, 0.22kg)
- 1 copper ($1, 0.01kg)
- Ring of Swimming (+5 to Swim when worn, $2600, neg.)
- Golden medal ($250, neg.)
- Scroll Belt ($60, 0.5kg)
- Charged universal scrolls:
- Bravery, 2m radius ($400)
- Curse, 1 point ($300)
- Panic, 1m radius ($400)
- Alabaster Snake Eye ($1500, neg.)
- A Balanced Dwarven Mace with Puissance 1 ($5450, 2.5kg)
- Magic Armor (brigandine chest, light cloth limbs, no helmet, Fortity 1 and Lighten 1; $4674, 11.7kg)
- An unholy symbol worth $1000 as jewelry.
- 8 onyxes, each worth $250, for a total of $2000 worth of gems.
- A rare sacred text for the dead god Aroden, worth $1000, in the museum offices where Raul was working when the alarm was raised.
- 2 Victocora signet rings ($750 each) on the fingers of two of the zombies. Yup, Rexus’ parents.
-
-
Let's Play Hell's Rebels A01S12: Strategic Turn 3
Intro
We continue our Hell’s Rebels Solo Adventure!
This is our third strategic turn for Hell’s Rebels Adventure 01. In the last turn, the PCs:
- Increased their “management” skills to do a better job as officers.
- Recruited a team of Sneaks.
- Got their number of supporters up to 25.
- Got a critical failure when trying to gather information, increasing their Notoriety by 4.
- Handled an unhealthy rivalry between their new Sneak team and the Crow Sisters.
In the “tactical” phase, they resolved both the Crackdown at Clenchjaw’s and An Unsanctioned Excruciation events. This gave them 2 character poins total, plus Vendalfek as a special ally. It also increased Notoriety by a further 2 points.
I also realize I’ve been very lax about properly leveling up my rebellion, so let’s do that here as well.
[GM] Mythic Bookkeeping
Let’s keep the Chaos Factor at 6. I didn’t use the random tables at all, but things haven’t really gotten any less dangerous.
Our threads remain the same.
Threads
- The Path xxxx
- Find Shensen (Rosalia, Arcturus) x
- Contacting Ms. Docur (Jania)
- Get Organized (Jade) xx
Characters
- The Dottari
- The Chelish Citizens Group
- The Red Jills
- The Asmodeans
- The Three-Legged Devil (location)
- The Livery Grimples
- The Tengu Sisters
- Nan Comerivos & Friends
[Player] Proper Leveling
This was our rebellion sheet at the end of turn 2:
The Silver Ravens (End of Turn 2)
Includes Sentinel bonuses.
- Rank: 2/5
- Focus: Secrecy
- Members: 16
- Supporters: 25
- Population: 11900
- Treasury: $9650
- Min. Treasury: $100
- Notoriety: 6
- Org Skills:
- Loyalty: 11
- Secrecy: 13
- Security: 11
- Actions: 1
- Max Teams: 2+1
- Danger Rating: 20
- Active Events:
- Teams:
- Crow Sisters (bonus team)
- Tier: 1
- Members: 3
- Actions: Earn Money, Gather Information
- Freedom Fighters
- Tier: 1
- Members: 6
- Actions: Reduce Danger
- Sneaks
- Tier: 1
- Members: 3
- Actions: Secure Cache.
- Crow Sisters (bonus team)
- Allies:
- Laria Longroad
- +2 to Recruit Supporters as long as she’s a member.
- Leadership-12, Streetwise-12
- Rexus Victocora
- -1 Notoriety per Upkeep phase as long as he’s a member.
- Administration-12, Public Speaking-12
- Vendalfek
- Grants use of the Spread Disinformation action even if no other team does the same.
- If a team does grant the action, gives a +2 bonus to its skill rolls.
- Laria Longroad
- Officers:
- Demagogue: Rosalia
- May use complimentary skills on Loyalty checks.
- Skills: Propaganda, Public Speaking, Leadership.
- Partisan: Laria Longroad
- May use complimentary skills on Security checks.
- Skills: Strategy, Leadership, Tactics.
- Recruiters: Urist; Arthur
- May use complimentary skills on checks for recruiting supporters.
- Adds rebellion rank to the number of recruited supporters, and this stacks with multiple recruiters.
- Skills: Public Speaking, Streetwise, Savoir-Faire.
- Sentinel: Jade
- Occupying this post gives a +1 to the rebellion’s non-focused skills.
- May use complimentary skills on any check used to resolve an Event.
- Skills: any of the ones listed for the appropriate category.
- Spymaster: Jania
- Spymaster: May use complimentary skills on Secrecy checks.
- Skills: Intelligence Analysis, Streetwise, Administration.
- Strategist: Rexus
- Occupying this position grants a bonus action. May use its complimentary skills on the bonus action.
- Skills: Strategy, Tactics, Administration.
- Demagogue: Rosalia
I also added the +2 to Notoriety from the tactical missions, and Vendalfek as an ally.
Upkeep Phase
At the start of this phase, Rexus reduces our Notoriety by 1 to 5.
Step 1, Supporter Attrition - Unmodified Loyalty check, aided by Rosalia. The final modified roll succeeds by 2. We lose only 1d6 -> 4 supporters.
Step 2 - Notoriety Maximum: We’re just at 5, nothing to do here.
Step 3 - Treasury Shortage: We remain fine.
Step 4 - Increase Rank: We’re still above the minimum for rank 4, so we rank up twice!
That means all of our three traits increase by +1. Our maximum teams increase by +1. Our minimum treasury increases to $200 (pfft, easy). Our PCs each get two boons from ranks 3 and 4: a potion worth $1500 or less, and the title of Guardian.
Looking back at the quick and dirty rules I established on Scene 09, I don’t have rules for titles yet. In the original, those would come with bonus feats that seem to be of the “math tax” variety. Skill bonuses at rank 4, save bonuses at 9, and stuff like increased speed, initiative or HP at 14, and any feat they qualify for at 19.
Let’s instead give them a +1 Reputation with all who oppose Thrune at each of these levels, ending up at +4 at Rank 19. Let’s say it applies all the time to everyone except a large class (Thrune Supporters). That’s a x2/3 modifier, so let’s make it worth 3 points/level. The PCs don’t need to pay for it but it does increase their point value.
I’ve ammended the quick and dirty rules on scene 09 to account for this.
Activity Phase
We’re still at two actions here, with a bonus action for having a Strategist.
We can have another team, so I think it’s a good idea to recruit one. Let’s go with a team of Street Performers. This is an unpenalized Secrecy roll with a +2 from Laria and a +1 from Jania (2 successes, 1 failure). It’s a success, so we have a team.
Next I think we’ll spend our second action to upgrade our brand new Street Performers to Rumormongers, since the’ll benefit from our little fairy dragon’s help. That costs $250 from our treasury and requires no rolls.
And finally we will again use our bonus action to Recruit Supporters, because we still have room to grow. Unmodified Loyalty, plus +2 from Laria, +1 from Rexus’ Administration. A normal success and a somewhat poor effect roll gives us 7 new supporters. We’ll still be in rank 4 next turn.
Event Phase
Base chance for an event is the city’s Danger (20) + our Notoriery (5), without doubling since we did have an event last turn. We roll a 96, so nothing bad happens! However, the chance of an event will double next turn.
The Silver Ravens (End of Turn 3)
Includes Sentinel bonuses.
- Rank: 4/5
- Focus: Secrecy
- Members: 22
- Supporters: 28
- Population: 11900
- Treasury: $9400
- Min. Treasury: $200
- Notoriety: 5
- Org Skills:
- Loyalty: 12
- Secrecy: 15
- Security: 12
- Actions: 2
- Max Teams: 3+1
- Danger Rating: 20
- Active Events:
- Teams:
- Crow Sisters (bonus team)
- Tier: 1
- Members: 3
- Actions: Earn Money, Gather Information
- Freedom Fighters
- Tier: 1
- Members: 6
- Actions: Reduce Danger
- Sneaks
- Tier: 1
- Members: 3
- Actions: Secure Cache.
- Rumormongers
- Tier: 2
- Members 6
- Actions: Gather Information, Spread Disinformation
- Crow Sisters (bonus team)
- Allies:
- Laria Longroad
- +2 to Recruit Supporters as long as she’s a member.
- Leadership-12, Streetwise-12
- Rexus Victocora
- -1 Notoriety per Upkeep phase as long as he’s a member.
- Administration-12, Public Speaking-12
- Vendalfek
- Grants use of the Spread Disinformation action even if no other team does the same.
- If a team does grant the action, gives a +2 bonus to the skill roll for the action.
- Laria Longroad
- Officers:
- Demagogue: Rosalia
- May use complimentary skills on Loyalty checks.
- Skills: Propaganda, Public Speaking, Leadership.
- Partisan: Laria Longroad
- May use complimentary skills on Security checks.
- Skills: Strategy, Leadership, Tactics.
- Recruiters: Urist; Arthur
- May use complimentary skills on checks for recruiting supporters.
- Adds rebellion rank to the number of recruited supporters, and this stacks with multiple recruiters.
- Skills: Public Speaking, Streetwise, Savoir-Faire.
- Sentinel: Jade
- Occupying this post gives a +1 to the rebellion’s non-focused skills.
- May use complimentary skills on any check used to resolve an Event.
- Skills: any of the ones listed for the appropriate category.
- Spymaster: Jania
- Spymaster: May use complimentary skills on Secrecy checks.
- Skills: Intelligence Analysis, Streetwise, Administration.
- Strategist: Rexus
- Occupying this position grants a bonus action. May use its complimentary skills on the bonus action.
- Skills: Strategy, Tactics, Administration.
- Demagogue: Rosalia
[GM] What’s next?
The next “tactical” scene is going to be loooong, so I’m going to cut this one off here.
-
Let's Play Hell's Rebels A01S11: Crackdown at Clenchjaw's
Intro
We continue our Hell’s Rebels Solo Adventure!
As mentioned last scene, I’m doing this week’s tactical mission on a separate file from the strategic turn, since that one ran long. Today, we’ll be running through “Crackdown at Clenchjaw’s”, which should be a nice and breezy affair.
I played this in January 2026, over a couple of days.
[GM] Mythic Bookkeeping
We’ll keep the Chaos Factor at 6 and all the Mythic stuff just as it was:
Threads
- The Path xxxx
- Find Shensen (Rosalia, Arcturus) x
- Contacting Ms. Docur (Jania)
- Get Organized (Jade) xx
Characters
- The Dottari
- The Chelish Citizens Group
- The Red Jills
- The Asmodeans
- The Three-Legged Devil (location)
- The Livery Grimples
- The Tengu Sisters
- Nan Comerivos & Friends
[PC] Crackdown at Clenchjaw’s
In the middle of the PCs’ various investigations, Laria comes to them with rumors that Clenchjaw’s tavern is becoming suspiciously rowdy, and that it might soon attract unwanted attention.
Rosalia knows about the place, a tavern near the docks. The establishment is named after a local species of oyster. Its owner caught the same nickname because he strictly forbids talk of politics inside the building, and kicks out anyone who breaks the rule. Nevertheless the place is usually frequented by people who might sympathize with the Ravens, especially since some of the more overtly anti-Thrune bars around town were burned down.
The thing with the rowdy patrons is new, however. Clenchjaw has been getting sleepy as the evening goes on, and when he dozes off the brawls begin. You can almost set your clock by them. Something’s off. This might seem like a small thing, but it would be in their interests to keep this place running and to prevent it from drawing dottari.
So one fine afternoon, our heroes decide to go bar-crawling. Our scene will consist of them investigating the weirdness at Clenchjaw’s.
[GM] Scene setup
Let’s check for altered or interrupted scenes, because our “player” has a walkthrough in hand and it’d be too easy to solve this case with the PCs’ skills.
A roll of 1 means we get an altered scene.
Let’s say that things have progressed further than anticipated. The titular crackdown is going to happen tonight. The dottari have already caught wind of Clenchjaw’s being a place where “dissidents” hang out and have fights, which gives them a perfect excuse to hand out beatings.
So there’s 6 dottari hanging out near the bar and as soon as anything resembling a fight starts, they’ll kick down the door and try to bust some heads.
The trip itself is uneventful, as the excitement is at the end.
[Player] At Clenchjaw’s
The group arrives there at around 5 PM, and what they spot is a relatively normal tavern. Other people are starting to stream in and soon things begin getting more lively.
Rosalia actually… kinda loves this? It’s been a while since she’s had the opportunity to party a little. She has Compulsive Carousing and I’m making her fail the resistance test on purpose. This is a -5 point disadvantage, so she will be a bit tipsy and have -1 to all rolls this scene. Urist will soon end up joining her, and will suffer from the same penalty.
The rest of the PCs will pace themselves a little better.
They spend their first hour at the tavern, looking around, talking to patrons, eating, and drinking.
By the end of that hour Rosalia is leading a few people in a tavern song, her awesome bard voice accompanied by a lot of tuneless revelry, including from Urist.
“… and the cow jumped over the – wait, is that a dragon?”
The dragon in question is about the size of a cat, with green scales and colorful butterfly wings, and is sneaking around the tavern’s rafters. Both of our tipsy delvers spotted it before anyone else, which was funny. The creature squeaks in panic and immediately begins to fade away as the other PCs and quite a few patrons look at it.
Jania knows the creature is turning invisible and begins casting her See Invisible spell… but rolls a 17, which is a critical failure! She rolls a 5 on the critical failure table, meaning that spell affects the wrong target. Since this was a beneficial step, it affects a nearby foe, and the closest thing to that here is Vendalfek himself.
Since Invisibility takes 3 seconds to cast, he has time to giggle at the goof before vanishing as he begins running away.
Unfortunately several of the tavern’s patrons also saw him, and the relatively small commotion caused by that is enough to draw the dottari in. They arrive with their maces and shields out, their commanding officer shouting to ask what’s going on here. Time to defuse the situation.
Jania and Rosalia step forward to handle them, acting all friendly and trying to reassure them no braws are happening here, mister officer, no sir. Meanwhile, the other PCs hang back a bit and prepare to “defuse” the guards should worse come to worst.
Rosalia takes the lead in talking, with Jania supplying the occasional “helpful” statement to further muddy the issue. With the drunkenness penalty, her reaction bonuses and the +1 from Jania’s successful aid attempt, we’re looking at an effective Fast-Talk skill of 19, which is awesome because the rule of 16 is only for supernatural effects. This should be a trivial victory over the dottari sargeant’s unimpressive Will of 11.
… and then she goes and rolls a 18, which is always a critical failure.
So what happens is that the sargeant becomes convinced he’s in front of someone he can pass off as a genuine rebel. He grabs Rosalia by the arm and drags her outside the tavern. Jania desperately keeps talking to defuse the situation, but the guards grab her too. The rest of the PCs see this unfold and soon follow them out. No one else does.
[GM] I Just Had The Most Wonderful Idea
These dice sure gave me some surprises. I expected this to be a mostly mapless social and investigative challenge, and here we are gearing up for a fight against six dottari.
I actually made a map of the tavern’s exterior for this, but though there are some interesting terrain quirks in there this is mostly just another boring street map. It was boring to make, and I feel that as a player it’d be mostly boring to play through.
So let’s spice things up a little, because I have a downloaded map here that slots right into Foundry. It’s the one for the Unsanctioned Excruciation scenario.

You see, the dottari here aren’t very interested in due process. They want to be entertained, and the only thing that entertains them is cruelty. Now they could just beat Rosalia and Jania to death in an alley, but one of them decides to get clever.
Barzilai has been paying bounties for large dogs, delivered alive to the dottari, because he’s going to use those for official excruciations in the near future. If they’re gonna do that anyway, why not start early? Mr. Smart Guard knows just the place.
Our group is savvy enough to realize they’re taking the pair of them away from the tavern without harming them just yet, which ends up being good because they don’t want to draw heat to the place by murdering six guards on its doorstep. So even though Art has some trouble holding back his righteous anger, the rest of the group decides to follow the guards at a safe distance.
And as GM I’m saying they manage it because I don’t want to have a fight in a boring street.
The guards take Rosalia and Jania to a small square a ways away from the tavern, where an doghousing setup has just been built but not yet inaugurated. The dogs are already inside, and the process of starving them to make them mad is well underway. They chuck Rosalia and Jania in there after relieving them of their weapons, and stand around to watch for the rest of their shift.
[Player] Unsanctioned Excruciation
As explained in the book, “doghousing” is a public torture method devised by Barzilai. The victims stay confined in the “doghouse” at the center during days and nights, and they must spend this whole time sitting uncomfortably because there’s nails inside that will stab into them if they try to stand or lie down. At dusk and dawn, they’re let out to eat… if they can manage to steal the food from the two angry chained dogs.
Rosalia and Jania are still out of the doghouse, as they wanted to see them react to the dogs. The guards are hanging around to enjoy the view for a moment and plan to lock one them in later and feed the other to the dogs. Three of them are on the western side of the square, three on the eastern one.
Our group arrives at this point. They split up with Urist and Art on the west side, and Jade by herself on the east. The guards have not noticed them yet, and this gives Urist time to charge up a three dice Sunbolt to blast one of them with as an opener.
Turns 1-4
After the opener I rule the guards are surprised, because fuck ‘em. They’re mentally stunned and will need to succeed at an IQ roll before they can do anything, as usual.
Jade begins this “by the book”, stepping forward and verbally challenging a guard. Art runs in stabbing, though his knife ends up deflected. Urist draws his axe and begins closing in, though he’s considerably slower to get within melee range.
After some moments of fright preceding the fight, Jania and Rosalia realize that unlike the dogs they are not chained. They edge away from the dogs and towards the gate closest to Rosalia (and Jade). The dogs’ chains prevent them from reaching the prisoners.
While the fighting rages on outside, Jania decides to push her magical lock-opening trick to its limit. by taking a -10 skill penalty to open the nearest lock instantly. That’s a 50/50 chance for her, and she does it. The two prisoners just manage to squeak through the gate while barely keeping away from a dog’s jaws.
Outside some of the guards recover from the mental stun inflicted by surprise, forcing our PCs to engage them first. Arcturus manages to incapacitate a guard with his signature grab-and-stab move, while Urist covers his flank. Jade has no problem keeping her three assailants at bay but has some bad luck on her attack rolls.
The escaped PCs have no weapons, Rosalia is able to help Jade a bit by re-stunning a guard with her Song of Humiliation, while Jania begins charging up an Ice Dagger spell.
Turns 5-8
Things are taking a bit longer to resolve here than I’d like. Seems like these dottari aren’t very good at offense when compared to the characters, but their defenses are high enough to require some special handling.
Anyway, atfer a lot of back and forth, Arcturus folds a guard’s clothes with the guard still inside, then holds the other so Urist can axe him a few questions. Jade fences and then stabs the non-stunned guard, and then kills one of the stunned ones while Jania impales the other with a large-ish Ice Dagger.
After the Fight
All guards are down. The party quickly retrieves Rosalia’s and Jania’s weapons and then leaves the square. On their way out they hear a high-pitched voice calling to them from the a nearby barrel. “You guys are fun! Good thing the bad men didn’t get you!”
It’s the little dragon, who looks less frightened now. Rosalia steps forward to talk to him, because she’s just delighted to see it up close. His name is Vendalfek. He explains he lived in the tavern, which used to be a fun place until the bad men started hanging around and then it wasn’t any more. He had been trying to spice things up again, you see.
Rosalia invites him to come live with them and put his magic to work pranking the bad men, and that’s that. They all go home.
[GM] Ending the Scene
The party didn’t manage to handle the situation without getting into a fight, but they did recruit Vendalfek, so that’s 1 point to each PC. They do get another point for winning the fight, though. Their notoriety also increases by (1d4 -> 2).
[GM] Analysis
Dottari are really annoying to fight, because while their offensive skill is relatively modest, their defenses are high enough to succeed a lot of the time. And I think I might have forgotten the -4 to defenses for stunned characters several times in this fight, to boot, so it got turned into a bit of a slog at the end.
-
Let's Play Hell's Rebels: Adventure 1, Scene 10
Intro
We continue our Hell’s Rebels solo adventure!
Looks like doing one strategic turn and one mission takes long enough that I should split each of these into a separate scene. So here we’ll do the second week of our strategic layer then find something else to do as a mission.
This took me a couple of days to play through, a bit at a time.
[GM] Mythic Bookkeeping
Let’s increase the Chaos Factor to 6.
We mark a step on Get Organized, and will consider that done once we have moved to a permanent base. And let’s give 1 CP to everyone for it. Rosalia gets a step in her Find Shensen quest, because last mission advanced this a bit. I know they already got another CP out of the associated challenge, but let’s give them another one for the step.
Threads
- The Path xxxx
- Find Shensen (Rosalia, Arcturus) x
- Contacting Ms. Docur (Jania)
- Get Organized (Jade) xx
Characters
- The Dottari
- The Chelish Citizens Group
- The Red Jills
- The Asmodeans
- The Three-Legged Devil (location)
- The Livery Grimples
- The Tengu Sisters
- Nan Comerivos & Friends
[GM] ~Record Scratch Sound~ Wait A Minute!
Looking at the recordings for last scene reminded me of something, and I want to deal with that right now.
There are many occasions where the original adventure path kinda gatekeeps developments behind level or story progression.
The first means an early book will sometimes provide an answer to a mystery the PCs are investigating, but set it up in such a way that they’ll only be able to solve it once they’ve leveled up a bit and gained the necessary abilities. For example, book 1 tells the GM Shensen has been turned to stone and is being kept in the opera house. However, the opera house is being used as Thrune’s personal fortress, and the PCs will only have the abilities they need to locate Shensen and break into the place at the end of book 3.
Other times, a bit of information is outright retconned in a later book. The later book introduces new information that was impossible to discover earlier because it wasn’t true back then.
One example of that is Shensen’s music shop! In the previous scene, which is from Volume 1, we are told that both the shop and its basement are completely collapsed. But in volume 4 we learn that there’s an entire intact section of the basement that gets turned into an eight-room dungeon by the villains of the hour. And it’s also inhabited by Shensen’s sapient dinosaur friend, who’s hiding from both the occupying villains and the rest of Thrune’s forces.
Now, Volume 4 says that both the villains and the dinosaur moved in “several weeks” before the day in which the PCs finally delve into the dungeon, but those chambers should still be there! They even have a tunnel leading from the surface to an only partially collapsed room right at the end, that could conceivably be found by PCs before then.
We don’t know how many weeks away from that scene we are yet, but it’s probably more than “several”. Let’s say they move in somewhere during Adventure 3 when the PCs are out of town. So in Adventure 1, that hasn’t happened yet.
What has happened is the Night of Ashes, when Thrune agents raided and torched the place. Some bits of description in Volume 4 makes me think they were in kind of a hurry, as there was a lot going on that night. They gained entrance to the secret basement, kidnapped Shensen, and looted the place of its obvious valuables, but didn’t stop to ritually desecrate the shrine area, figuring the fire would destroy it.
So this is how things in there should be in Adventure 1:
A1 - Tainted Reservoir : The slime naga and its oozes are already here. They’re said to have moved in shortly after the Night of Ashes.
A2 - Secret Entrance: Nothing here, as always.
A3 - Shensen’s Bedroom: The bedroom is empty of creatures. The secret compartiment in the armoire still has all the listed treasure, which belongs to Shensen and not to the monsters.
A4 - Corrupted Chapel: This chapel is not corrupted yet, and it’s completely deserted. No monsters here.
A5 - Chapel Vault: The vault is still ransacked, as that’s said to have happened during the Night of Ashes. It’s also deserted, as Hetamon Haace hasn’t been captured.
A7 - Dawnflower Font: The font is still consecrated and operational!
A8 - Ruined Chambers: Still ruined, and deserted since Gut-Tugger hasn’t moved in yet. There’s a tunnel linking it to the surface ruins, which the PCs can only find at the GM’s sufferance even in Volume 4.
Do I let them find the place? They did spend an hour searching the ruins.
In Adventure 4, all of the DCs to find hidden stuff in here are are around 25-35. PCs are supposed to be level 10 when they get here. A “party radar” character might have started with Wisdom 18, increased it to 20 at levels 4 and 8, grabbed the Alertness feat at some point, and put points in Perception all the way from level 1, meaning they have 13 ranks in the skill. That’s a +20 bonus. DC 25 requires a 5+, DC 30 a 10+, DC 35 a 15+.
According to our ad-hoc conversion for the strategy layer bits, those difficulties would be a -6, -8, or -10 to Perception or Observation, and to get approximately the same chances of success we’d need someone with a 18 in either of those. Our top scores are 14 currently, for Jania, Urist, and Rosalia. Jade has a 12, Arcturus a 10. Let’s say the passage to A8 could be spotted with a check at -8 (equivalent to DC 30). So that’s three rolls vs. 6, and one vs 4. Do any of our heroes manage to sequence break?
Nope, the best roll is a 9.
So in theory this was all just a little fun exercise that didn’t lead to anything… but maybe those penalties are too harsh? D&D scaling difficulty kind of assumes that the skill in question keeps increasing, but that might not be the case at all in GURPS.
Looking to the DF 2: Exploits a “genuinely difficult” adventuring task is a -4 or -5. Let’s do -4, the same difficulty of finding the treasure box. This is a separate, secret, and free roll that they make alongside the ones for searching for clues.
Everyone still fails when the penalty is a -4, as I’m not rerolling. But this does give me some food for thought when it comes to difficulties for future tests. We’ll get to this in Adventure 4, I guess.
[Player] Strategic Turn 2
Anyway, time for playing. Here’s our starting org sheet.
The Silver Ravens
- Rank: 1/5
- Focus: Secrecy
- Members: 16
- Supporters: 14
- Population: 11900
- Treasury: $9650
- Min. Treasury: $50
- Notoriety: 1
- Org Skills:
- Loyalty: 10
- Secrecy: 12
- Security: 10
- Actions: 1
- Max Teams: 2+1
- Danger Rating: 20
- Active Events:
- Teams:
- Crow Sisters (bonus team)
- Tier: 1
- Members: 3
- Actions: Earn Money, Gather Information
- Freedom Fighters
- Tier: 1
- Members: 6
- Actions: Reduce Danger
- Crow Sisters (bonus team)
- Allies:
- Laria Longroad
- +2 to Recruit Supporters as long as she’s a member.
- Leadership-12, Streetwise-12
- Rexus Victocora
- -1 Notoriety per Upkeep phase as long as he’s a member.
- Administration-12, Public Speaking-12
- Laria Longroad
- Officers:
- Demagogue: Rosalia
- May use complimentary skills on Loyalty checks.
- Skills: Propaganda, Public Speaking, Leadership.
- Partisan: Laria Longroad
- May use complimentary skills on Security checks.
- Skills: Strategy, Leadership, Tactics.
- Recruiters: Urist; Arthur
- May use complimentary skills on checks for recruiting supporters.
- Adds rebellion rank to the number of recruited supporters, and this stacks with multiple recruiters.
- Skills: Public Speaking, Streetwise, Savoir-Faire.
- Sentinel: Jade
- Occupying this post gives a +1 to the rebellion’s non-focused skills.
- May use complimentary skills on any check used to resolve an Event.
- Skills: any of the ones listed for the appropriate category.
- Spymaster: Jania
- Spymaster: May use complimentary skills on Secrecy checks.
- Skills: Intelligence Analysis, Streetwise, Administration.
- Strategist: Rexus
- Occupying this position grants a bonus action. May use its complimentary skills on the bonus action.
- Skills: Strategy, Tactics, Administration.
- Demagogue: Rosalia
Upkeep Phase
At the start of our turn, Rexus reduces its Notoriety by 1, to 0.
Step 1 - Unmodified Loyalty check, aided by Rosalia’s three complimentary skills. We get a normal success, so we lose “only” 1d6 supporters. That’s 3, so we’re at 11.
Step 2 - Our Notoriety is zero, nothing to do here.
Step 3 - Our treasury is fine.
Step 4 - We’re still beyond the Rank 2 supporter threshold, so we level up!
That means we increase our focus trait by +1, have 2 rebellion actions per turn, and grant the Training +1 boon to all our PCs. That means they get to put 4 CP any one skill.
-
Arcturus adds them to his Karate, increasing it to DX+1. He punches better but is still more or less dead weight in the strategy layer.
-
Jade buys Intelligence Analysis, which is bolstered by Born War Leader.
-
Jania buys Administration. The woes of command.
-
Rosalia buys Area Knowledge for Kintargo, this was already supposed to be her thing.
-
I’ll let Urist split his 4 points: 2 into Administration, 1 into Public Speaking, 1 into Religious Ritual.
Activity Phase
We have two standard actions and one bonus action from having a Strategist.
Let’s start with the Recruit Team action, to recruit a team of Sneaks. That’s an unpenalized Secrecy roll, and it gets +2 from Laria, and a total of +4 from Jania’s complimentary skill rolls. We get a critical success here, but I don’t think that has any additional effect.
The other action is Gather Information, using the Crow Sisters as the acting team. It’s Secrecy -2, but all the bonuses from team tier and Jania’s complimentary skills bump this to an effective 17. We want to know about Shensen.
And we roll a 18!
Not only was this a failure, but it also increases our notoriety by 1d6 == 4. Now I see why these jokers were run out of their former town, they draw a lot of unwanted attention.
We’ll use our bonus action to Recruit Supporters. Loyalty, +2 because Laria is here, +1 from Rexus’ Administration. A normal success, meaning we recruit 2d6+4 supporters (rank 2, 2 recruiters). That’s 14, taking us to 25!
Event Phase
Okay, we’re now in the Event Phase. Our base chance of an event is 24%, but it’s doubled to 48% because we had no events last turn. We roll a 13, so we get an event. The Danger Rating for the city is 20, so we need to roll 1d100+20 on the provided table.
That’s the Rivalry event. Two of our teams develop a rivalry and neither of them can be used in the next Activity phase. It makes sense for these to be the Crow Sisters and our newly-hired Sneaks. And this is actually super bad for our rebellion!
One of our Officers can make a social skill test to mitigate this and end the rivalry before it can do damage to our operations. I’ll say it’s a Leadership issue, and that Diplomacy or Intimidation can act as complimentary skills here. This is an event, so our sentinel Jade is going to handle it.
I’m going to say the check is at -2, but Jade has Leadership-17 so we’re still doing pretty well here. We succeed, the event is mitigated, and the doubling of the chance goes away for next turn.
The Silver Ravens (End of Turn 2)
Includes Sentinel bonuses.
- Rank: 2/5
- Focus: Secrecy
- Members: 16
- Supporters: 25
- Population: 11900
- Treasury: $9650
- Min. Treasury: $100
- Notoriety: 4
- Org Skills:
- Loyalty: 11
- Secrecy: 13
- Security: 11
- Actions: 2
- Max Teams: 2+1
- Danger Rating: 20
- Active Events:
- Teams:
- Crow Sisters (bonus team)
- Tier: 1
- Members: 3
- Actions: Earn Money, Gather Information
- Freedom Fighters
- Tier: 1
- Members: 6
- Actions: Reduce Danger
- Sneaks
- Tier: 1
- Members: 3
- Actions: Secure Cache.
- Crow Sisters (bonus team)
- Allies:
- Laria Longroad
- +2 to Recruit Supporters as long as she’s a member.
- Leadership-12, Streetwise-12
- Rexus Victocora
- -1 Notoriety per Upkeep phase as long as he’s a member.
- Administration-12, Public Speaking-12
- Laria Longroad
- Officers:
- Demagogue: Rosalia
- May use complimentary skills on Loyalty checks.
- Skills: Propaganda, Public Speaking, Leadership.
- Partisan: Laria Longroad
- May use complimentary skills on Security checks.
- Skills: Strategy, Leadership, Tactics.
- Recruiters: Urist; Arthur
- May use complimentary skills on checks for recruiting supporters.
- Adds rebellion rank to the number of recruited supporters, and this stacks with multiple recruiters.
- Skills: Public Speaking, Streetwise, Savoir-Faire.
- Sentinel: Jade
- Occupying this post gives a +1 to the rebellion’s non-focused skills.
- May use complimentary skills on any check used to resolve an Event.
- Skills: any of the ones listed for the appropriate category.
- Spymaster: Jania
- Spymaster: May use complimentary skills on Secrecy checks.
- Skills: Intelligence Analysis, Streetwise, Administration.
- Strategist: Rexus
- Occupying this position grants a bonus action. May use its complimentary skills on the bonus action.
- Skills: Strategy, Tactics, Administration.
- Demagogue: Rosalia
[GM] This Week’s Mission
What should I throw at myself this time? Let’s take a look at what’s available.
-
Mission 1, Decoding the Documents: Ongoing, we’re at week 2/7.
-
Mission 2, Investigating the Fires: We did this one on Week 1.
-
Mission 3, Prisoners of Salt: We did this one on Week 0.
-
Mission 4, Murders in the Nursery: Meaty, but unecessary.
We have a total of three instances of “Did the Temple Hill Slasher somehow return from the dead?” missions. This one, another one in Adventure 2 where it’s a copycat, and one way into Adventure 5 where he really does return. I think we can drop this one entirely, and run the one from Adventure 2 early if it becomes necessary.
-
Mission 5, Crackdown at Clenchjaw: I want this to occur as written and since it’s far simpler than the Temple Hill Slasher caper, we can have it happen now.
subscribe via RSS