Posts
-
Let's Read the 4e Monster Manual 3: Devil, Slime
Copyright 2010 Wizards of the Coast This post is part of a series! Click here to see the others.
This is another one of those monsters that’s all about blurring the lines between fiends. These monsters are devils, but they break the design rule that says devils have a human-like appearance.
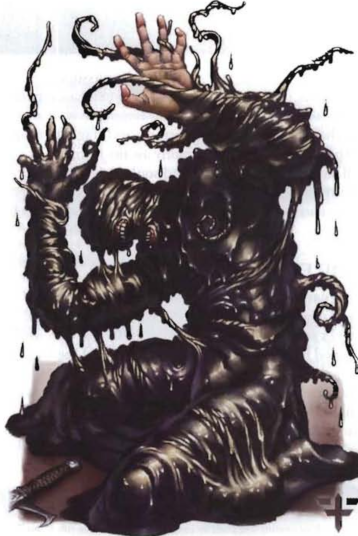
Slime Devils are amorphous oozes, though unlike most “true” oozes they’re sapient and rather smart. They probably originated in some past edition as well, because they’re the second devil said to be formed from the souls of dead sinners (which is not a 4e thing). They arise from the mixture of the toxic mud in the swamps of Minauros with the hatred that seeps from the souls of corrupt inquisitors who are stuck there. Their abilities make them adept interrogators and torturers, since they can read the minds of people they envelop and inflict intense pain on them.
They’re often summoned to act in this capacity by villains in the world, so they’ll be found alongside those villains’ guards and jailers. In Hell, they travel with burlier devils, and with those whose controller-y powers can hold enemies down to be engulfed.
The Numbers
A Slime Devil is a Medium Immortal Humanoid (Devil, Ooze), and a Level 16 Lurker with 123 HP. The lore does say their base form is vaguely humanoid, but still I’d probably classify them as Magical Beasts instead. Either way, it doesn’t change their other stats.
They have Darkvision, ground and swim speeds of 6, and Resist Acid 20 instead of the usual devil fire resistance. Their Mercurial Body trait allows them to ignore difficult terrain and not provoke opportunity attacks when moving. They’re still vulnerable to a Fighter’s Combat Challenge or other similar abilities, but non-defenders can’t hold them in place.
Their basic attack is a Caustic Slam that targets Fortitude and does acid damage. They can also stretch into Acidic Tendrils that attack up to three creatures at Reach 3, deal immediate and ongoing acid damage, and pull them 2 squares.
The slime devil’s main trick is Diabolical Engulfment, which targets reflex and grabs on a hit. Grabbed targets are dazed and take ongoing 10 acid damage while the grab lasts. The creature occupies the same space as the victim, and pulls the victim along when it moves. Attacks that hit the slime devil deal half damage to it and half damage to the victim.
As a minor action (1/round), the slime devil can use Scour the Mind on its grabbed victim. This targets Will. On a hit, the devil poses a question to the victim, who must choose between answering truthfully and taking psychic damage. The amount of damage is the same as a basic attack, which is a lot for a minor-action power. The creature can do this and still use its basic attack to fight off the victim’s friends.
Final Impressions
Lore-wise, kinda meh. I’m not a fan of bringing the old “fiends come from the souls of sinners” cliches back into D&D. They’re more interesting mechanically, because I love attack powers that force PCs to choose between two bad outcomes.
-
Let's Read the 4e Monster Manual 3: Devil, Rage
Copyright 2010 Wizards of the Coast This post is part of a series! Click here to see the others.
Looks like the Monster Manual 3 is all about blurring the lines between fiends. We have a devil who became a demon lord, demons who became devils, and now a devil who behaves like a demon. I haven’t run into rage devils before. If they appeared in previous editions, it must have been in a late MM or a specialized supplement.
The Lore
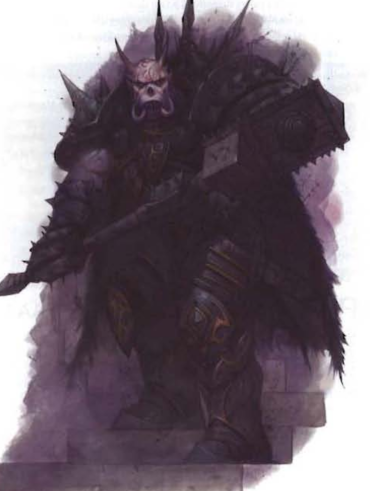
A Rage Devil is what happens when you take a standard Hell Knight and inject demon ichor into it. They’re hulking brutes who are constantly angry and delight in carnage. In other words, they’re pretty much demons, or they would be if their flesh wasn’t bound with empowered Supernal sigils that keep them pointed in the right direction.
These creatures are the result of an infernal experiment to create more powerful shock troops to throw into the meatgrinder of the Blood War. They’re actually a little weaker than a standard hell knight, making them a bit of a failed experiment. Maybe they adapted the process for the mass-produced version so it works on legion devils instead.
Rage devils are used as heavy elements attached to legion devil forces, and are often placed under the command of hell knights. In their free time, these things roam Avernus in search of demon stragglers or anyone else they can get away with smashing.
The Numbers
Rage Devils are Large Immortal Humanoids (Devils), and Level 11 Brutes with 138 HP. They have Darkvision and Resist Fire 20, but they can’t fly. Their ground speed is 6.
These devils are heavily armored and fight with Disrupting Mauls whose basic attacks strip all of the target’s resistances for a turn! They have a special technique named Demonscourge Crush (recharge 4+), which deals the same damage as a basic attack, weakens, and strips all resistances (save ends both). Another maneuver is Maul Storm an at-will Close Burst 2 that deals some damage and pushes targets 3 squares. If they’re bloodied, they’re also knocked prone.
Their Blood Rage passive trait makes them deal extra damage on all attacks against bloodied opponents.
Final Impressions
Rage devils are indeed an excellent weapon both against demons and against other devils, as well as any creature type that relies on high elemental resistances. Behavior-wise they tend to be on the shallower end of the demon cliche pool, with only their binding rituals preventing them from turning on their devilish masters.
As I said above, I’d probably say most rage devils are modified legion devils, because baseline Hell Knights are both stronger and smarter than these things, so turning a Hell Knight into a Rage Devil is a bit of a waste.
-
Let's Read the 4e Monster Manual 3: Devil, Passion
Copyright 2010 Wizards of the Coast This post is part of a series! Click here to see the others.
This is the first time I come across passion devils, but they give me strong 3e vibes.
The Lore
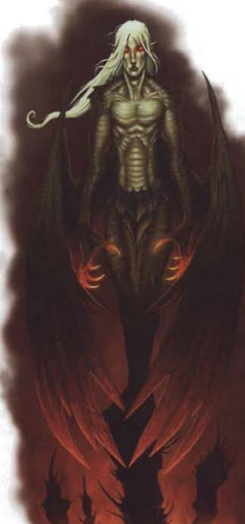
Do you want to employ seductive and manipulative devils in your villainous schemes, but feel that succubi are too nice? Fierna, archdevil ruler of Phlegethos, sure did! In order to fulfill her very specific needs, she created Passion Devils.
The reason these creatures give me a strong 3e-or-earlier vibe is that they feel like the sort of grid-filling exercise that was very common in those games. Succubi were considered demons back then, so when they needed to fill the “seductive manipulator” niche on the devil side they created a completely new creature.
In 4e, passion devils are kinda like a specialized succubus variant tied to Fierna. As incarnations of her vanity, they’re made in her image but always have some extra imperfection in their forms so their mistress remains the fairest of them all. They’re sent to infiltrate mortal societies just like a succubus, and they’re also used to replace the leadership of Fierna’s own cults so she can keep tabs on them. When used as official emissaries and ambassadors, they are often protected by a unit of bearded devil bodyguards.
The main difference between a baseline succubus and a passion devil is that the latter have serious anger management issues. When their tempers flare, their disguises tend to melt away as the passion devil abandons all subtlety and resorts to force. This is obviously what happens when the PCs thwart their plans, but it could also happen if they run out of patience while trying to employ standard succubus strategies. At least their fire powers make them better combatants than succubi when the jig is up.
The Numbers
These creatures are Medium Immortal Humanoids with the Devil keyword, and Level 16 Controllers. They have Darkvision, Resist Fire 20, and move at speed 6 on the ground or in the air. A pretty standard devil toolkit.
They project a charm aura (1) that makes others see them as a Object of Desire and take a -2 penalty to saves against dazing effects.
Their basic attack is a claw that targets Reflex and does fire damage. They can also be “gentler” and employ a Fiery Touch that does less damage and dominates for a turn. The ability that combos with their aura is Beckoning Whispers, a non-damaging attack against Will that pulls targets 5 squares and dazes them (save ends).
Finally they have an area attack named Passion’s Flames, a Close Burst 3 that deals fire damage and forces any dominated enemies it hits to make melee basic attacks against targets of the devil’s choice.
As a minor action, the passion devil can change shape to appear like a Medium humanoid. The DC to see through the disguise is a respectable 36, but it’s less stable than that of a succubus and ends when the devil attacks.
Final Impressions
It’s a Succubus Plus with a temper. Lore-wise they’re Fierna’s trademark servants, so they fit into any adventure where she’s the main enemy. Otherwise you might want to use leveled-up succubi from the Monster Vault, or reskin these into succubi as appropriate.
-
Let's Read the 4e Monster Manual 3: Devil, Hellwasp
Copyright 2010 Wizards of the Coast This post is part of a series! Click here to see the others.
I don’t remember seeing hell wasps before, but they sound like the sort of monster that might have debuted in 3e.
The Lore
In past editions the Blood War was this eternal alignment-based conflict, but here it’s part of Asmodeus’ safety net. You see, the other gods don’t like Asmodeus very much, both because he’s an evil asshole and because he got his position by murdering a popular non-evil deity.
One of the measures he took to prevent them from ganging up on him was to commit the considerable armies of Hell to the task of containing the demons of the Abyss. As we mentioned before, demons are too busy with infighting to launch regular invasions on the rest of the universe, but when they do manage to briefly get their shit together and spill out, they find a few legions of devils waiting to fight them. Hell also launches occasional raids into the Abyss to prevent demons from organizing.
This isn’t a war that rages on eternally, but a series of sporadic conflicts that flare up whenever one of the two sides feels a bit stronger. The gods lets Asmodeus be because he provides a valuable service, and because providing that service also serves as a check on his power. Asmodeus and his underlings in the meantime keep enacting diabolic schemes to acquire more power in an attempt to dominate the other gods.
One of the most enthusiastic participants in the Blood Wars seems to be Glasya, Asmodeus’ daughter. Because of this she tends to be involved in stories where demons and devils switch sides, corresponding to her failures and successes. We already heard about Graz’zt the devil who became a demon lord. And now we get to hear about a whole species of demon who became devils.
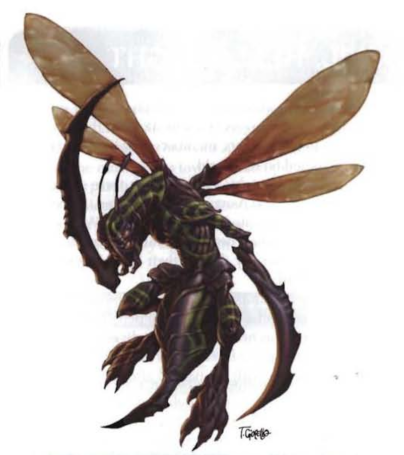
Hellwasps were once a species of demon related to the insectile mezzodemons, servants of a wasp-like demon lord whose name was lost to time. Glasya fought and killed this demon in one of her raids, and its spawn immediately swore allegiance to her. She took the lot of them to Hell and converted them into devils. Now they inhabit the Garden of Delights, a region of Malbolge. As loyal servants of Glasya, they can be found alongside any of her other servants or allies.
The Numbers
Hellwasps are Medium Immortal Magical Beasts (devils). They have Darkvision and a Flight Speed of 8 (hover), but their ground speed of 0 means they can’t actually walk. They fight with their natural weapons: a pair of sword-like talons, and a huge venomous sting.
Hellwasp Colony Guard
This is a Level 19 Minion Skirmisher of the kind you can find by the score in hellwasp hives. Their Sword Talon attack allows them to shift 1 square before or after the attack, and their Sting deals poison damage, slows, and prevents the target from shifting for a turn.
They’re good for slowing the PCs down and setting them up to be surrounded by sturdier allies. The ability to shift away after a talon attack makes them slightly less vulnerable to melee-centric PCs.
Hellwasp Devil
The regular version is a Level 23 Skirmisher with 212 HP. Since it’s higher level it probably represents an exceptional individual within a hive, of the kind that gets loaned out to allies and sent on away missions.
Aside from a somewhat weak Sword Talon attack, the hellwasp can also perform a Talon Skewer. This also counts as a basic attack. It allows the wasp to fly its speed and make two talon attacks at any point along the movement. The wasp doesn’t draw opportunity attacks when moving away from the target of these attacks. If both attacks hit the same target, the wasp grabs them, and the Drag Off trait allows it to pull the grabbed victim when it moves without drawing opportunity attacks from them.
Yes, this is another one of those fliers that allows you to have fun with cliffs. And at epic level we’re probably taking the cliffs of Hell itself, which have lava pools or other layer-appropriate hazards at the bottom.
Hellwasp regulars also have a stronger Sting. It deals more poison damage, slows, prohibits shifts and deals ongoing 15 fire damage (save ends all). This is a “recharge 5+” attack, and a good one to use on a PC that was dragged off to an isolated position.
Final Impressions
Bugs with sword-arms that slot neatly into the same slot as Swordwings. Perfect for those players who dislike monsters that lack ties to AD&D lore. You can reskin these into swordwings, or take inspiration in swordwing abilities when building more hellwasp varieties.
Mechanically, they’re interesting without overstaying their welcome. It’s always fun to see a monster who can carry PCs off and drop them into lava pits.
-
Let's Read the 4e Monster Manual 3: Devil, Hell Knight
Copyright 2010 Wizards of the Coast This post is part of a series! Click here to see the others.
Death Knights have a long and storied existence in D&D, but this is the first time I hear of Hell Knights.
The Lore
Hell Knights are absolutely not Nazgul, no way, no how. They’re narzugons, which is a completely different thing. Jokes aside, their origins are quite tragic.
The first hell knights used to be servants of He Who Was, the god Asmodeus rebelled against. Asmodeus tricked them into betraying their former master, and their betrayal damned them to serve Asmodeus forever. From that point forward, whenever someone got tricked into betraying their deity, they would become new hell knights upon death.
I think this is the first time I see an explicit mention of people going to Hell and becoming devils in 4e. This used to be a 3e thing, so I guess Hell Knights come from that edition. It could also be that angels and other immortals become hell knights when they get tricked into betraying their deities, if you want to play it that way.
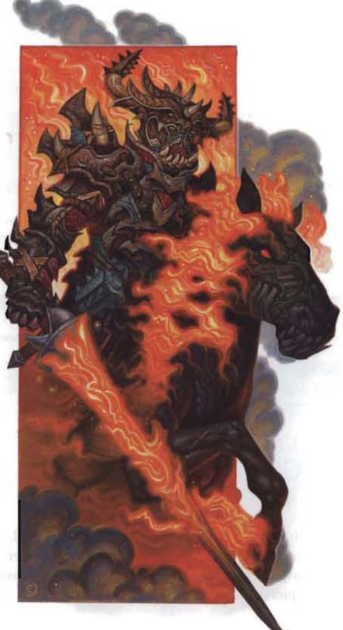
Though hell knights are powerful, becoming one is definitely a form of punishment. A Hell Knight’s existence is an eternity of hatred. They hate themselves for their betrayal, they hate their new masters, they hate their immortality, and they hate free mortals. Though many of them serve Asmodeus directly, every potentate of Hell has at least a few knights at their disposal. The most famous group of them is the Order of the Nightmare, so named for their preferred mounts. Other groups have other mounts, like the mammoth-riding knights of Cania, or the ash riders of Avernus with their wyverns.
Hell Knights usually only associate with members of their own order, but will work together with other devils when commanded to do so.
The Numbers
Hell Knights are Medium Immortal Humanoids (devils), and Level 15 Soldiers with 146 HP. They have Darkvision, are immune to fear, and have Resist 20 Fire. Their ground speed is 6, but they will almost always be mounted on something faster. Their gear is the full “Classic Knight” setup of plate armor, heavy shield, a lance, and a mace.
Their Hell’s Rider trait allows their mount to use the knight’s Athletics, Acrobatics and Stealth scores if they would be better than the mount’s own. The mace does bonus fire damage and knocks prone on a hit, and the lance has better base tamage and crits on a 19-20 when used on a charge. Both count as basic attacks.
As a minor action they can use Eyes of the Narzugon, which causes a creature within 10 squares to be marked and slowed for a turn. This is an effect, so it auto-hits.
Final Impressions
Hell Knights pair really well with Nightmares! As I mentioned in the Nightmare article, enemy riders can still take actions independently of their mounts, so the knights can charge with their lances and maces at the same time their nightmare mounts set the map on fire. Since they have native fire resistance, they can ignore the burning terrain even when unhorsed.
A simple but effective hell knight encounter would consist of three knights and three nightmares, using classic medieval cavalry tactics (charge early, charge often). This group’s lack of ranged attacks would be compensated by the nightmare’s high teleport speed.
subscribe via RSS