Posts
-
Let's Read the Neverwinter Campaign Setting!
Copyright 2011 Wizards of the Coast. Before I started writing this post, I was convinced the Neverwinter Campaign Setting was the last setting book for D&D 4th Edition. Turns out there were two more published in the following year, one for Undermountain and another for Menzonberranzan.
I didn’t even remember these books existed, which I guess makes sense since they seem to have a much narrower potential audience. Neverwinter, in contrast, is probably the most famous place in the Forgotten Realms, and at the time of this book’s release in 2011 it was even known to a lot of people who were outside of the FR fan community.
That’s because by that point in time the city had already been the setting for two successful computer games! Neverwinter Nights came out in 2002. It’s the game that put Bioware on the map, and it didn’t take long for it to develop a huge trove of fan-created modules and expansions, in addition to the official ones it got in the years following its release. The sequel was developed by Obsidian and came out in 2006, and though it was less open to fan additions it kept getting expansions up to 2009.
And there was also the third big game featuring Neverwinter, the MMORPG of the same name. It was developed concurrently with the book, something the book itself makes a point of advertising in a side box in its introduction. I think the book came out a little earlier than the game, because delays are a fact of life in video game development, but they’re much more integrated than I thought at first. The MMO is still active as of this writing, over a decade after its launch.
Of course, the Neverwinter Campaign Setting is also perfectly capable of standing on its own merits. It places a much greater emphasis on the “campaign” part of “campaign setting”, which was a novel approach when it came out and influenced the presentation of most 5e campaign books too.
The Book’s Introduction
The very first thing we see after the table of contents is an Introduction chapter that explains its approach in a very concise manner. The book cover the city of Neverwinter and its immediate surroundings, focusing on a small area of a larger, already-published setting (Forgotten Realms). It’s not a static atlas or travelogue - it’s a tool for running a campaign. It’s meant to be easy for a GM to customize, and its player options help build PCs that are deeply involved with several big plots that can make permanent changes to the setting.
The book is geared towards the Heroic tier (levels 1-10), so all threats and challenges in the area are appropriate for characters of those levels. This includes the main villains of the piece. Your PCs will not be stuck fighting the grunts and flunkies of some epic-level villain. They will get to face legendary threats on their own, without any overpowered NPCs around to bail them out or to steal the scene.
I’m paraphrasing the book here, and I like that these assurances are right on the first page. It’s an important thing to include when dealing with the Forgotten Realms, which has been traditionally full of untouchable epic villains and scene-stealing epic NPCs.
The also emphasizes that the situation presented in its pages is a starting point - it’s a situation that will quickly begin changing as soon as the actual game starts. The PCs are not only expected but encouraged to get in there and meddle with things. There is plenty of intrigue going on and adventure hooks are everywhere, but the story itself is not on rails. Just as the PCs are encouraged to change things, the GM is encouraged to adapt to their actions and not try to force a pre-determined outcome. This is a very nice sentiment! Let’s see if they manage to uphold it.
Rules-wise, the book is going to make heavy use of character themes. Themes were introduced in the Dark Sun Campaign Setting book as a new “thing” to complement your class in the Heroic tier, just like paragon paths and epic destinies do later. Dark Sun had several Athas-specific themes, and I think Dragon Magazine introduced a few other more generic ones later. Neverwinter presents its own set of themes, which are even more specific than Dark Sun’s - each of them ties into one of the major plot threads they describe here, and some of them even make the PC in question the “main character” of that thread.
As for required book, the core set is a given - that can either be the PHB+DMG duo or the equivalent Essentials set of Rules Compendium and “Heroes of…” books, though it’s going to place a bit more emphasis on the latter. In both cases the Monster Vault is recommended over the Monster Manual, and the Forgotten Realms books (Player’s Guide and Campaign Setting) are nice-to-haves in order to flesh out the wider setting and give players a few more options.
Over the next few posts, we’ll be looking a the book chapter by chapter. Some chapters my take up more than one post. This should take a lot less time than the monster books did, but I hope you enjoy it just the same.
-
Fuzzy turns in GURPS Combat
As you might know from reading here before, I hang out on the RPG.net forums a lot. Whenever a discussion about GURPS starts there, some people often complain they feel intimidated or annoyed by the 1-second combat turns.
Other games tend to have a less granular concept of turn duration and of what exactly constitutes an action, so players used to them usually expect to be able to do one “complete thing” in each turn without bothering with detailed setup steps. For example, a ranged attack with a bow in D&D takes a single action that includes aiming, shooting, drawing a new arrow, and nocking it, all of which are distinct steps in GURPS.
I actually like 1-second turns and will be keeping them in my games, but I present here a possible way to make them fuzzier for those groups who don’t enjoy them as much. This is a fairly fundamental change to the base GURPS system, probably lends itself better to games that used simplified combat rules instead of things like detailed hex maps and range measures.
This also helps combat feel a bit more like what you might see in action movies or similar media, which tend to slow down things to make them easier to follow.
Fuzzy Combat in GURPS
Under this rule, a combat round is no longer exactly 1 second long. Now it takes an unspecified amount of time between 5 and 10 seconds long - enough for everyone to act once.
Single-maneuver actions that can be resolved in a 1-second turn under the original rules still take 1 turn to resolve here. This includes most melee and ranged attacks, movement, and the Aim and Evaluate maneuvers. Advantages such as Extra Attack and techniques like Rapid Strike work exactly as written, with the same limitations, but read “seconds” as “turns”. The RoF stat retains its value for all weapons that have it, but read it as “shots per turn” instead of “shots per second”.
Actions that would take multiple consecutive maneuvers over several turns to perform now take 1 turn per 10 seconds or fraction thereof they would originally take. Some examples:
-
Swapping magazines on a modern gun took 3 seconds, so now it takes 1 turn.
-
Reloading a musket took 40 seconds, so it takes 4 turns now.
-
Any spell that would require less than 10 seconds to cast can be cast in a single turn.
-
Searching through your pack for an item took 2d seconds. As the average of that roll is less than 10, it only requires a turn.
-
Picking a lock takes a minute, which means 6 turns. Accepting a -5 penalty to do it in 30 seconds means it takes 3 turns. This makes it possible to do during a fight.
The Fast-Draw skill now encompasses a series of actions taken to speed up a given process. It can reduce the time an appropriate action takes by 1 turn, to a minimum of 0. So you can still use it to draw a weapon and attack on the same turn, or to reload a pistol and keep firing on the same turn. That musket is still going to take 3 turns before it can fire again. You might want to make it Average instead of Easy since a single roll covers a larger set of actions.
These changes make characters such as archers and wizards more powerful in combat, since the number of things they can do over a given amount of turns has increased, while melee-focused character can still take more or less the same number of actions. Note that I have not tested how these changes interact with the magic system, so I can’t measure how much of an impact it’s going to have on spellcasters.
Things we Avoided
Note that we didn’t attempt to increase the effective number of actions by the same multiplier as the turn duration. If a character could attack every second under the standard rules, they don’t get to make 5-10 attacks in a single turn here. Aiming or Evaluating for multiple seconds gave you extra bonuses, but you don’t get them automatically here - you must perform those maneuvers for the same number of turns. Our goal is to remove multi-step complex procedures, not to keep counting seconds.
Yes, this is more abstract and perhaps less realistic, and that is the point. If you want to keep tracking events second-by-second, stick with the standard rules.
-
-
I'm done with Threats to the Nentir Vale! Now what?
The Wolf Runners were the last monster entry in the book, and after that there’s only a glossary index. So we’re done with this book!
And not only that, we’re also done with my big project of reading all of the main D&D 4th monster books. I remember I started it January 1st 2019, with the first posts going into an RPG.net thread and appearing here shortly afterwards. So it took us a little over 4 years, 4 months, and 15 days to get it all done.
Writing all of this was an interesting experience. The idea for the project came at a time when I was having a bit of a hard time coming up with subjects for posts to this blog, mainly because I was getting anxious about writing good articles. I’d think of something, then I’d begin writing, and then I’d get blocked or mired in an endless round of revisions.
Writting commentary on D&D monsters, in contrast, felt extremely easy. I could sit down, cover a bunch of entries, and have them ready for a regular release schedule. Granted, I had a hard time sticking to any sort of schedule for most of the project’s runtime, but I think I did a pretty good job of it in Threats.
Most people who read these entries here in the blog were probably 4e fans instead of the usual GURPS crowd, unless they happened to follow my RSS feed directly or something like that. None of those posts had a GURPS tag, so they didn’t appear in the aggregator I’m a member of.
I still want to have a ready source of posts for Octopus Carnival, and I also really like the conversations I had in the RPG.net threads for the project, so I’m going to begin a new Let’s Read. There’s voting going on in the RPG.net thread for Threats, with the following candidates:
-
Neverwinter Campaign Setting for 4e. I have it, and I have opinions about it, so it’s a good subject.
-
Hell’s Rebels for Pathfinder, with commentary about converting it to other systems. Extremely convenient because I’ve already written a lot about it in this blog. Might also give me more incentive to actually finish the adventure path too.
-
Dungeon Fantasy Roleplaying Game: A large enough effort that I’d need to give it serious thought. It would probably not be a page-by-page affair, but it definitely merit the GURPS tag.
Check the thread linked above if you want to vote or comment on any of the entries. Otherwise sit back and enjoy the knowledge that there will soon be a new thing to occupy your usual Let’s Read slots.
-
-
Let's Read Threats to the Nentir Vale: Wolf Runners

Copyright 2011 Wizards of the Coast. This post is part of a series! Click here to see the others.
The last entry in the book.
The Lore
Looks like the Raven Roost bandits have some competition! The Wolf Runners are another of the bandit gangs who prey on the Trade Road between Fallcrest and Hammerfast. They have this name because their leader, Sylish Kreed, has somehow gained the loyalty of a pack of grey and dire wolves, and has them aid the gang when they attack caravans.
Kreed presents himself as the dashing rogue type, and tries to be civil and good-humored when dealing with his victims. The gang vastly prefers to take its victims’ valuables without a fight, and to leave them alive and free to go. This both lessens the heat upon them and gives them the opportunity to rob the same people again in the future.
The counter-balance to this, however, is that Kreed is a terribly sore loser. If he ends up on the losing end of a battle, he’ll become sullen and obsessed with taking revenge on whoever beat him. He doesn’t necessarily want to kill the offender, but he won’t rest until he’s re-established his superiority.
This sort of alpha-asshole behavior and the wolves might have tipped you off to the gang’s big secret: Kreed is a werewolf, having caught lycanthropy from a bite a few years back. He can transform at will most of the time, but for three days on every full moon he loses control, changes into a wolf, and goes off to live with his pack until his rational mind returns. Kreed’s condition is not public knowledge, though I guess his gang-mates know of it.
His main lieutenant certainly does: that’s Eveni Redblade, a tiefling whom he rescued from the Dark Drake of the Moon Hills some time ago, and who as a result is completely loyal to him. Speaking of loyalty, the wolves are also loyal to Kreed personally, though they tolerate the gang and vice-versa.
Wolf Runner ambushes tend to consist of a troop of archers hidden in the woods off to both sides of the road, while Kreed and his wolf pack block the path and handle the intimidation plus melee fighting that proves necessary.
The Numbers
Other than the unusual nature of their leader and his “understanding” with those wolves, the Wolf Runners are a typical bandit gang that uses typical bandit stat blocks. The wolves are also typical, using standard stats for grey and dire wolves from the Monster Vault.
In this section, we get stats for Kreed, Eveni, and the Runners’ archers.
Wolf Runner Swiftarrow
With the wolves acting as melee muscle, many of the Runners focus on archery instead. Swiftarrows are Level 5 Artillery with 50 HP. They have decent melee and ranged attacks with a short swords and a longbow, and their Close Shot maneuver lets them make a free bow attack whenever an enemy moves adjacent to them, without provoking attacks of opportunity.
Eveni Redblade
The tiefling lieutenant is a Level 5 Skirmisher with 60 HP. She’s always On The Move, ending any slowing or immobilization effects on her at the start of her turns. She also does extra damage against targets granting combat advantage to her.
Eveni fights with a Longsword whose basic strikes let her shift 1 square before or after the attack, and she can also use Dazing Strikes (recharge 6+) that as the name implies damage and daze for a turn. Rounding out her arsenal is the default Infernal Wrath power tieflings get, which lets her do a bit of automatic fire damage to someone who hits her once per encounter.
This is a standard mobile combatant package. Eveni works best with plenty of people to set up flanks and other advantageous situations for her.
Sylish Kreed
The (wolf)man of the hour is a Level 6 Elite Skirmisher with 144 HP. He has all the werewolf signature traits, starting with Regeneration, which as usual shuts down for a turn if he takes damage from silvered weapons.
He can also Change Shape to assume human, wolf, or hybrid forms. In human or hybrid form he can use a Greatsword that provides standard basic attacks. In wolf or hybrid form, he can Claw and Bite. The claw does more damage to bloodied targets and lets Kreed shift 4 squares on a hit. The bite knocks targets prone and exposes them to werewolf moon frenzy as described in the Monster Vault. The Bloodmoon Fury ability lets him either attack twice with the sword or make a claw and a bite attack on the same action.
Final Impressions
I like the Wolf Runners a lot more than I like the lizardfolk, that’s for sure. I also think it’s interesting that the Wolf Runners have a lot of other factions to worry about even if the PCs never fight them directly.
If they really operate on the Trade Road, they’re in direct competition with the Raven Roost gang and/or the Blackfang Gnolls, both of which are a lot more murderous than themselves. If we instead move them to King’s Road, they’re going to contend with the Iron Circle in Harkenwold and possibly with the Daggerburg Goblins.
All of the Wolf Runners presented here are Unaligned, so you can easily play them as rogues with hearts of gold and have them as possible allies against an unjust lord or against some of the other factions, Robin Hood-style.
-
Let's Read Threats to the Nentir Vale: Witchlight Lizardfolk
Copyright 2011 Wizards of the Coast. This post is part of a series! Click here to see the others.
I’ll get this out of the way first: this entry fully buys into all the tired racist stereotypes for D&D humanoids. Already in its second sentence, it calls them “primitive, tribal, cruel” and cannibalistic. I’m going to strip all of this out and try to present a less bad version.
The Lore
There are several lizardfolk tribes living in the Witchlight Fens. A good number of them are under the rule of the dragon Shadowmire, but not all. All of them are territorial and tend to distrust outsiders, as mentioned in the Monster Manual 1 version of their writeups.
The Witchlight Fens got this name because the local fauna includes several different times of “witchlights”, mundane or magical creatures that are capable of producing spheres of glowing light visible in the distance. One species, known as “fastlights”, usually tries to flee from living creatures, but the lizardfolk of the Fens have learned to trap and tame them.
The three largest tribes in the area are the Brackmarsh, who enthusiastically swore loyalty to Shadowmire and as a result have been able to conquer much of the northern and western portions of the Fens, driving their rivals out; the Mistkillers who live in the eastern sector and feud with the Daggerburg goblins, only occasionally obeying the dragon; and the Crushwater, who live in the fens’ central region and fiercely resist draconic dominance.
None of them are likely to receive PCs who don’t belong to the same tribe with open arms, but I think it should at least be possible to negotiate with them. The Brackmarshes or other tribes you add that are more directly controlled by Shadowmire are even less likely to be friendly to people who don’t also serve the dragon, and will probably make a good portion of his ground troops.
The Numbers
All of the tribes mentioned here have a mix of all three standard lizardfolk ethnicities, and can contain a mix of the standard stat blocks from the Monster Vault or other sources. We also get a new batch of stats that apply to them specifically and can be used elsewhere.
As usual, the lizardfolk here have a speed of 6 and Swamp Walk, and have no special senses or resistances.
Lizardfolk Mire Scout
A quick but fragile scout with a pet fastlight. It’s a level 3 Minion Skirmisher. It fights in melee with claws that let it shift 2 squares as an effect, but prefers to keep away and harass enemies with Fastlight Shots that do radiant damage.
Lizardfolk Bog Walker
A beefier warrior who’s more at home than usual in the water. This is a Level 3 Soldier with 44 HP and a swim speed of 4 in addition to its normal movement described above. The bog walker can make basic claw attacks, but it prefers to grab its does and drown them with Drag Down.
This can only be done if the bog walker is in water at least 1 square deep, and doesn’t already have a grabbed victim. It’s a melee attack vs. Reflex, and on a hit it damages and grabs the target (escape DC 13). Until the grab ends, the target must make a DC 13 Endurance check at the start of their turns, and take 10 damage if that check fails. Even on a miss with the initial attack, the target is still immobilized for a turn.
10 damage per turn is a lot for the early Heroic tier. PCs are at a real risk of drowning if they have a run of bad luck on their rolls and don’t get help.
Lizardfolk Fen Spy
This Level 4 Lurker is also proficient in the use of fastlights as a weapon. It can use its Witchlight Mists ability to become invisible as an at-will standard action, and from there it can use a ranged Fastlight Strike to deal heavy radiant damage, inflict ongoing 5 radiant damage, and blind (save ends both). If it can’t become invisible again due to PC pressure, it will use basic attacks with its thorn dagger, which deal poison damage and inflict a -2 penalty to AC and Reflex.
Lizardfolk Shocker
A spellcaster specializing in lightning magic, it’s Level 5 Artillery with 50 HP. The shocker wields a Greatclub in melee, and slings lightning spells at range. There’s the single-target at will Witch Lightning, and there’s the encounter Ball of Lightning, which is basically a fireball with a different element.
When someone hits then with a ranged or area attack, they can react with a sudden jolt that deals automatic lightning damage to the attacker, which means you want to close on them fast instead of trading shots from afar.
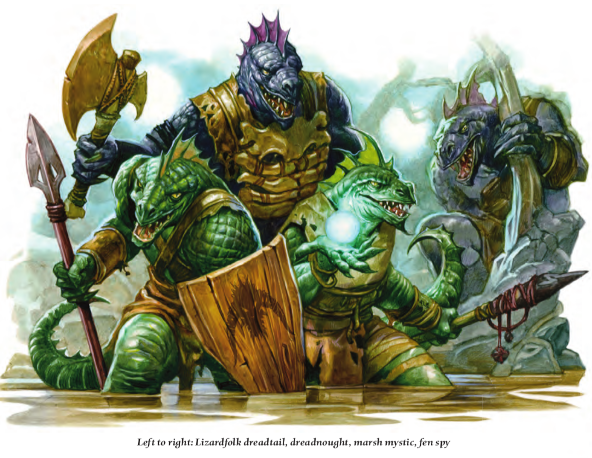
Lizardfolk Dreadtail
A warrior who believes you shouldn’t skip tail day at the gym. Dreadtails are Level 5 Soldiers with 52 HP. They fight with spears that damage and mark for a turn, but they can also use Reach 2 tail slaps that do less damage but target Reflex and knock prone on a hit. Their Slap Down maneuver (recharge 5+) allows them to use both in a single action. If someone marks the dreadtail, its Spirit Interference reaction marks the offender right back.
Dreadtails want to mark dangerous PCs, and then keep them prone with repeated tail slaps. There’s no special ability to punish a PC who ignores the mark, but it’s hard to fight anyone while prone.
Lizardfolk Dreadnought
A chieftain or lieutenant whose Large size ensures it’s a terrifying sight in battle. It’s a Level 7 Elite Brute with 190 HP and the Leader tag. The Dreadnought’s Wrath is a palpable thing that acts as an aura (2) which gives allies inside a +2 bonus to hit and damage.
Like most brutes, dreadnoughts want to be right in the thick of the melee. Their skills make them excellent at disrupting the enemy front line and opening the way to the squishies at the back. Their basic Greatclub attacks do heavy damage, push the target 2 squares, and let the dreadnought shift 2 squares to chase the enemy. As minor actions, they can distribute Low Blows that target Fortitude, do the same damage, and knock prone.
Once the way is opened, they can the You Fight Now! minor action to let an ally within 5 squares make a free charge attack. This ally and any others who make it through will then stick close to their boss to enjoy that attack bonus.
Lizardfolk Chief
A more sophisticated leader with a simpler stat block, the chief is a Level 7 Soldier with 156 HP. It fights with a Battleaxe whose blows slow for a turn on a hit, and can make Double Attacks with it. If an enemy adjacent to the chief shifts, it can attack them with a Tail Lash that does light physical damage and knocks prone. Once per encounter it can use Fighting Spirit to allow every ally in a close burst 2 to make a free basic attack.
The chief works well as the core of the enemy front-line, using its slow and trip powers to keep PCs from reaching its squishier buddies.
Lizardfolk Marsh Mystic
This is a variant of the Bog Mystic from the Monster Vault, of a lower level and with some abilities replaced by Witchlight-specific traits. It’s a Level 4 Controller (Leader) with 53 HP.
Its first novel trait is Marsh Mist, a very wide aura (10!) that prevents allies inside from being surprised and gives them a +5 to Perception and Stealth. Its spear can damage and slide targets 2 squares on a hit, and its main ranged attack is a Fastlight Shock that deals lightning and radiant damage, and immobilizes for a turn. If the target was already immobilized, it’s dazed instead. On a miss, it slows for a turn with no damage.
The mystic can also cast a Bog Cloud, an encounter Area Burst 1 that deals poison damage and dazes (save ends) on a hit. On a miss, it deals half damage and forces targets to grant combat advantage (save ends).
These are excellent ambush leaders whose presence will all but guarantee the PCs are surprised, and whose riders on their many attacks will keep them locked down for Team Monster’s strikers.
Final Impression
There’s good mechanical variety here, but I am very unimpressed with the book’s default portrayal of lizardfolk. This is a big let-down after the Wandering Tower.
subscribe via RSS